These were the cards we put together in our Stamp-A-Stack Class. I have to admit, this is my favourite all-time stamp set and punch combo.
The colours for the cardstock were Daffodil delight, Pumpkin Pie, Rich Razzleberry, Tempting Turquoise, Gumball Green and Real Red, all stamped onto Whisper White. We stamped the envelopes as well.
Additional punches: Bird builder and Blossom builder for the leaves. The sentiments are from Word Play: a retiring stamp set. Get it while you can! Visit my online store to view the full retirement list.
Showing posts with label blossom punch. Show all posts
Showing posts with label blossom punch. Show all posts
Saturday, 8 June 2013
Thursday, 27 September 2012
Peace Card - Stampin' Up!
Although it's still a little early to be making Christmas cards, I wanted to use the "Peace on Earth" sentiment from the Greetings of the Season - Stampin' Up! stamp set in the Holiday Catalog.
As a meditation teacher, I often use peace as a theme with my students, and it's a sentiment that can be used all year round, not just at Christmas.
This card also features the - Stampin' Up!Elegant Butterfly Punch. It co-ordinates perfectly with the - Stampin' Up! Papillon Potpourri stamp set, which I hand coloured with Elegant Eggplant and So Saffron markers, then added a few dots of Dazzling Details and attached it with a Glue Dot.
I stamped the card with the - Stampin' Up! Mixed Bunch stamp set in Raspberry Ripple, and hand coloured around the centres in So Saffron. The smaller flowers are stamped in Elegant Eggplant ink. I stamped an extra flower in Raspberry Ripple, then punched it out using the Stampin' Up! Blossom Punch, and added some Elegant Eggplant lines with the dual tipped marker, curved the petals with my Bone Folder, and popped it up with a dimensional.
I hope you enjoy this card.
SUPPLIES:
Stampsets:- Stampin' Up! Greetings of the Season, Papillon Potpourri, Mixed Bunch
Punches: Elegant Butterfly. Blossom.
Ink: Elegant Eggplant, Raspberry Ripple, So Saffron.
Cardstock: Whisper White
Adhesive: Glue dot, Dimensional.
Dual-tip Marvellous Markers: Elegant Eggplant, So Saffron
Embellishments: Dazzling Details glitter adhesive.
Tuesday, 14 August 2012
One Card SIX Different Ways Supplies List - Stampin' Up!
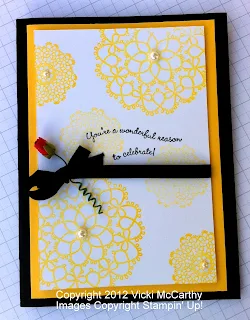
Here are the supplies and measurements for my Youtube - Stampin' Up! Tutorial, One Card SIX Different Ways.
Card Stock: - Stampin' Up! Whisper White, Real Red, Basic Black
Ink: Real Red
Stamp Sets: Delicate Doilies, Mixed Bunch
Embellishments: Scallop Dots Ribbon Basic Black
Basic Jewels Pearl, Rhinestone
Liquid Pearls, White
Scotch Tape
Snail Adhesive
Tombow Multi purpose glue
Dazzling Diamonds Glitter
Button from the Brights Designer Buttons (small Red flower button)
Glue Dots (to adhere the pearl to the button)
Measurements:
Card base Whisper White 16cm x 10.5cm, scored and folded in half
Real Red layer 10cm x 7.5cm
Scraps of Basic Black and Whisper White for punching out the blossom shape (stamp the white card scrap with real red then punch out the image).
Wednesday, 1 August 2012
Birthday Cards - Stampin' Up! Australia
I needed to make 2 birthday cards this week.
I hope you like the cards!
If you would like to come to a class in St Peters, Sydney just email me, or I can come to your home (minimum of 4 guests) and give a private class.
Thanks for visiting, and have a great day.
- This card is for a teenager's 18th birthday. I wanted a nice masculine card, so I used the - Stampin' Up! pennant punch to make a banner.
- I cut the scallop edge using the scallop framelit.
- Next I scored the front of the card every 1/2 inch using the Simply Scored Tool to give an embossed effect. This is a really versatile way to jazz up any card front and you can score on the diagonal as well if you have the diagonal plate.
- Each flag has a circle cut from the owl builder punch ( middle sized circle)
- The stamp is from the the Pennant Parade stamp set, and I finished the card off with some linen thread, and glued on some separate tiny bows.
This next card was for a teenage girl who loves the clean and simple look. I kept the card fresh by using only two colours, Whisper White and Pear Pizzaz.
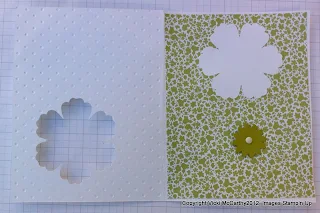
- I started by punching out the flower with the blossom punch near the bottom right hand corner of the card.
- Next I ran the card front through the Big Shot using the polka dot embossing folder.
- I layered a piece of Twitterpated Designer Paper inside the card and attached the punched out blossom in the top right hand corner making sure it didn't show through onto the front when the card was closed. This allows a space for journalling.
- Next I cut a strip of pear pizzaz card stock for the front and punched out the flower centre using the boho blossoms punch.
- I stamped the greeting from the Apothecary Art Stamp Set
- I pierced holes using the paper piercing tool and inserted white brads into both these pieces of card stock then affixed the greeting to the front and the centre to the flower (which I lined up with the card closed) using Dimensionals.
I hope you like the cards!
If you would like to come to a class in St Peters, Sydney just email me, or I can come to your home (minimum of 4 guests) and give a private class.
Thanks for visiting, and have a great day.
Friday, 20 July 2012
Card Making and Paper Craft Classes, - Stampin' Up! Sydney- Stampin' Up! Australia
We will be doing 2 make and takes, and we'll also be playing with some new punches, doing some direct-to-stamp colouring and learning a stamping-off technique to give depth to your stamped image.
Date: Saturday August 11th 2-4pm
Venue: St Peters
Investment: $15 includes afternoon tea and all materials.
My Youtube tutorials.
This tutorial uses the Delicate Doilies stamp set, and I show you how to give it some extra BLING!
Subscribe to:
Comments (Atom)


