Wednesday, 31 May 2017

Sneak Peek: Soft Sayings Card Kit.


Don't you just love a sneak peek! Here is one of my favourite things in the new catalogue, which is only a few days away!


It's a brand new all-inclusive Card Kit called Soft Sayings. 

In the kit are 20 Cards, 2 of each design, in 3 different sizes, with matching envelopes. Everything comes in a neat presentation box so you can take it on the run and work on your cards at your own pace. Everything you need will fit inside the box. The stamps, ink spot and acrylic block are provided, all you need to supply is adhesive.

Here is a video showing you what's inside. The all-inclusive kit will be available in my online store from June 1st.

Item # 145466 $61.00


Thanks for shopping with me!
Have a wonderful day.

Vicki x 💝

Tuesday, 30 May 2017

Grab a Cafe Bag To Go. Australian Stampin' Up! Demonstrator


The very practical Petite Cafe Gift Bags #135826 have been a big success in my classes, as I love to include a surprise Goody Bag for everyone who comes to my classes Sutherland Shire.

The cafe bags are retiring soon, so I thought I would show you what I gave away in my last class. One of the fun techniques we tried was embossing on vellum, then scribbling over it with a marker to reveal the greeting, in this case "You are remarkable" from the Remarkable You stamp set.

The bags are lined with food-safe paper so they are perfect for giving baked goods too!

                                                                      BUY NOW
               Have a creative day, and thank you so much for shopping with me.  Vicki x 💝

Monday, 29 May 2017

Artisan Watercolour Technique

Hello, and thanks for visiting today. I promised I would show you some of the water colouring techniques I have been studying at the Regional Gallery.

This gorgeous stamp set Touches of Texture is just so easy to work with.
I used Arches Aquarelle paper for this technique, as it has a real tooth and soaks up the colours so thirstily. I generally use the Stampin' Up watercolour paper, but this technique works best with a really heavy paper.
I have a selection of different papers I use, and the results differ greatly, depending on the result you want to achieve.

To achieve this look I stamped in Memento tuxedo black ink, then took my thick brush and did a water wash over the area outside the stamped image in the places where I wanted a background effect.
I then applied the background colours by drawing a line with my Stampin' Write markers, without touching the stamped image, but staying close to the flower. 
I used a number 4 round brush for this, and came in with a number 2 round brush in the finer areas, dragging the colour out towards the edges of the background. 
When I had achieved the desired result I heat set the ink.

To colour the flowers I used the number 2 round brush dipped in water, then picked up colour from the lid of the ink pad. The stripes were made by simply leaving some areas bare. 

   I did the same technique with the centres and the leaves, and used a white Jellyroll marker to make a stippled ring around the middle of the petals, which gives a real 3D effect, as though the petals are curving outwards.


You can see in this close-up how I kept the background colours outside the stamped image.

The colours I used were Crushed Curry, Tempting Turquoise, Garden Green and Melon Mambo.
I stamped the words I Love You. You Are Fabulous, using the Thoughtful Banners Stamp Set onto Melon Mambo Cardstock.

Here you can see the stippled white ring I made with the white Jellyroll pen. 

I was absolutely thrilled with the result, and am looking forward to using this technique with all my large floral stamps.
I mounted the card onto Tempting Turquoise Cardstock, and used the same watercolour paper for the inside layer of the card.
Mission Accomplished!

I hope you enjoyed this tutorial.

Touches of Texture   Wood Mount 141934   Clear Mount 140517

 Thanks so much for shopping with me!  Vicki  x 💝


Sponging Irresistibly Floral Specialty Paper Part 2.


Hello, and thanks so much for visiting my blog today!

Sometimes a card comes together that feels just right, and when I saw how much the sponged background looked like a trellis, I knew some simple Whisper White framelits were all that was needed to bring it to life.

 I combined the Pretty Pines Framelits with Paisleys and Posies, and voila! ... all that I needed was a greeting, so I made a custom greeting from the Thoughtful Banners Stamp set. With a total of 54 stamps, this set has just about any greeting you can think of, and it was fun putting together a phrase that suited the card.

Thoughtful Banners Photopolymer 141614


The colours I used were Daffodil Delight, Tempting turquoise and Rich Razzleberry, and I mounted everything onto a Rich Razzleberry card base. The sentiment was heat embossed in white on Rich Razzleberry.


           Bundle and Save 10% Thoughtful Banners Stamp set plus Duet Banner Punch 142330
                                                                     BUY NOW

The stamp set comes as a bundle with a handy dandy punch (gotta love that!), which makes stamping a breeze. For my card I cut a simple banner from Rich Razzleberry and adhered it to the very edge of the card.


I enjoyed whipping up this project, and I can't get enough of this gorgeous Designer Series Paper , Irresistably Floral 141644 ,which is retiring soon.

Thanks for stopping by today, and I will have more projects tomorrow. Have a wonderful weekend.

                                       Thanks so much for shopping with me!  Vicki  x 💝

Sunday, 28 May 2017

Canvas Art with Felt and Birthday Blooms. Australian Stampin' Up! Demonstrator


Hello, and thanks for stopping by my blog today.
I love working on canvases. The work we do as card makers and paper crafters is often more art than card, and in this case I wanted to try something that I could use as a home decor piece. 


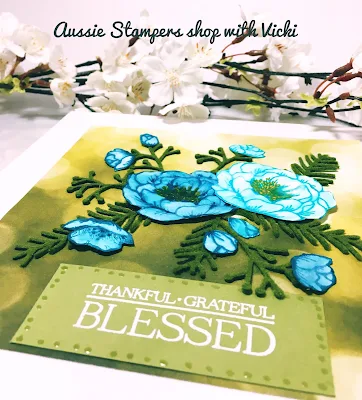
The stamp set Birthday Blooms is one of my absolute favourite sets for colouring. I used Shimmery White card stock, and stamped half of the blooms in Tempting Turquoise ink, and the other half in Dapper Denim ink.

I coloured inside the petals using a number 2 round brush and used the squeezed-together ink pads as my palette, drawing some of the colour from the stamped lines to soften the edges.

After the flowers had dried, I added some Crushed Curry with my marker to the centre of the two large blooms.

I cut out all the blossoms, and used some olive green felt to cut out the leaves with the Pretty Pines thinlits dies.

I adhered everything onto a 6" x 6" piece of Serene Scenery Designer Series Paper with the lovely Bokeh Pattern, which I had adhered to an 8" x 8" pre - primed canvas.
I  popped up a sentiment, "Thankful Grateful Blessed" from the Paisleys and Petals stamp set, which I had white heat embossed onto an old olive piece of card stock.

To give everything a shimmer, I added accents with a clear Jelly Roll gel pen.


This art piece now has pride of place in my entry way, and I love it!

Thanks for visiting. I hope you like this project idea.
Vicki x  💝

Sponging Irresistibly Floral Specialty Paper Part 1


Hello, and welcome to my blog.

Today I have made a card for you using the Irresistably Floral Specialty Designer Series Paper 141644. At  $22.75 for 12 12' x 12' sheets you will have enough for plenty of cards! Look how pretty this paper is when ink is sponged over the top. You can do this with sponge daubers or a sponge, or even a thick paintbrush.


Here is what the card looks like on the inside. I love making the inside as pretty as the outside, and I love the sentiment from the Paisleys and Posies Stamp set.

 The sentiment on the front is from Remarkable You, heat embossed in white on Basic Black card stock.

I have added the Paisley Thinlits Die as the focal image for the card, and mounted everything onto a Basic Black card base.


The colours I chose were Flirty Flamingo, Rich Razzleberry, Daffodil Delight, Emerald Envy, and Tempting turquoise. I feel it has turned out to be such a pretty card. What do you think?  
Have an awesome day, and I will be back tomorrow with more cards using this technique.
 Thanks so much for shopping with me!  Vicki  x 💝

Saturday, 27 May 2017

Irresistably Floral Embossing Specialty Designer Paper. Australian Stampin' Up! Demonstrator.


Hi there! Thanks for stopping by today.
I am really enjoying this paper, and the easy embossing effects you can get with it. I have paired it with the High Tide Stamp Set, and used some of the retiring doilies, as well as the stitched Framelits, which will be carrying over into the new catty.


Here is a close up of the coloured embossed image, using versa mark, Emerald Envy ink and clear embossing powder.


The colour combo is the same for both cards, and I used sponge daubers to blend the ink. Retiring Watermelon Wonder is the card base for this card, and Daffodil Delight is the card base for the other one. The other colour I used was Emerald envy, and I love how they turned out.

Have a great day, and make mine by leaving a comment. Thank you so much for visiting,

                                                            Vicki x     💝

Coloured Embossing Powder Technique. Australian Stampin' Up Demonstrator.

Hello, and welcome! I hope you are enjoying your weekend. I am busy crafting away, and playing with this super easy embossing technique.

The Irresistibly Floral Specialty Paper #141644 will be retiring soon, and I wanted to play with some more techniques using this paper. I just can't get enough of it!

Using my sponge, I blended some rich Razzleberry and Tempting Turquoise onto my focal piece, then wiped away any residue with a tissue. Easy!

I cut a very fine strip of Blushing Bride Glimmer Paper #140550 (also retiring) and punched out some teeny tiny stars with the retired star banner punch. I heat embossed the sentiment from the High Tide stamp set #143006  onto Whisper White Card stock, then cut it out using the stitched framelits.

                                                     High Tide Photopolymer #143006
                                                              BUY NOW

Can you figure out how I made Rich Razzleberry Embossing powder?

Simply stamp into the versa mark pad, and then immediately stamp into your Rich Razzleberry inkpad.  Use clear embossing powder over the top and heat set with your heat tool.

Isn't that a neat trick? You can make ANY COLOUR embossing powder using this technique. Just make sure you clean your stamp well.

I made a matching envelope, and mounted my art piece onto a tempting turquoise top fold card.

                      Have an awesome day, and thanks for shopping with me, 
                                                              Vicki x💝

Wednesday, 24 May 2017

Best Birds Simply Rendered. Stampin' Up! Demonstrator Sydney.


Hello, and thanks for visiting by blog today.
These two cards received a lot of comment at my stamp class, so I decided to post them for you to show how simply rendered cards are often the best. The rule of threes applies here....3 colours for the card: Whisper White, Daffodil Delight and Basic Black. The birds are cut out using the Birds and Blooms thinlits and the netting and sentiments are from the Best Birds Stamp Set. 
3 small rhinestones  were coloured using Copic Markers (or you could use a black Sharpie) and the cards were trimmed with black washi tape.
Simple and fast!
I have made a video for you to see how simple these cards are to make.


My Youtube Tutorial


Birds and Blooms Thinlits  141477
Best Birds Stamp Set  141525


Have a wonderfully creative day.
 Thanks so much for shopping with me!  Vicki  x 💝

Tuesday, 23 May 2017

Soft Watercolours Technique


Hello, and thanks for visiting my blog.

Today I have a card for you that is softly watercolored using an easy technique with your Stampin' Write markers and the Best Birds stamp set.

Using the branch stamp, colour directly onto your stamp using old olive for the leaves and soft suede for the branch.
Spritz some water (not too much) onto the stamp and stamp your image onto a piece of whisper white card stock. Have a paper towel handy to blot any excess, and then heat set with your heat tool.

Use the same technique for the bird image, using mint macaron marker for the wings, soft suede for the body, and so saffron for the beak and feet.

When your paper is completely dry, finish the card by adding some copper dots washi tape to a mint macaron card base, just under your art piece, then use glue dots to adhere some fine copper thread above the bird and to the right.

Use copper embossing powder for your greeting, then cut out using the tags framelits,  and add 3 white sequins to complete your card.

                                             Best Birds Stamp Set #141525 Photopolymer
                                                                BUY NOW

Have a wonderful day.  Thanks so much for shopping with me!  Vicki  x 💝

Sunday, 21 May 2017

Intense Graduated Wash and Hand Made Bubbles!


Hello, and welcome to my blog.
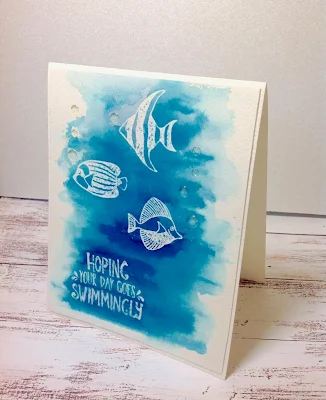
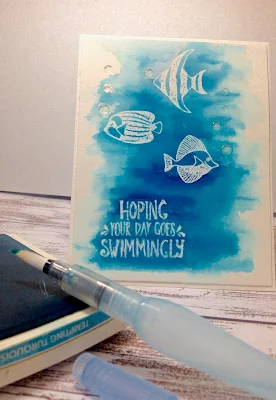
I have been experimenting with different watercolour papers to see how they respond to the Stampin' Up! inks, and I was blown away when I saw the intensity of colours you can achieve with Arches Watercolor 300 GSM Medium.


I stamped and heat embossed the images from  the Seaside Shore Stamp Set #141625 Clear mount, using clear embossing powder. You could also use white embossing powder and the effect would be very similar.

                                    Seaside Shore Stamp Set  Wood Mount #141622   #141625 Clear Mount

The key to a great watercolour card is to tape your work to something thick. I have plenty of backing sheets from all the 12 x 12 Designer Series Paper stacks I have purchased over the years, and find these are also handy when copic colouring, as the colour will bleed through onto your work surface if it is unprotected.

Back to the watercolour project... I used 3M low tack painters tape, which you can buy from any paint store. You may even have some already in the garage if you have been working on painting projects around the house, as Paul and I have!
Once you have taped down your watercolour paper you can get it as wet as you like. I always keep some folded paper towel handy for blotting up any excess once I start laying down my colour, and it is helpful for cleaning my Aqua painter as well.


Look at the intensity of Tempting turquoise! Wow!

The fish are practically jumping right off the page with such a strong contrast!
I let my project dry naturally, but you could speed it up with your heat tool.

For some added pizzazz I made 3 fun bubbles in large, medium and small, coming out of each of the fishes' mouths. Fun! 
I put 3 large, 3 medium, and 3 small dots of Crystal Effects onto my silicone craft mat and let it dry overnight. You have to be patient with this, as they have to be perfectly dry when you attach them to your finished card.  

I figured since I was allowing the art panel to dry naturally (and it was getting quite late in the evening as I love night-time stamping!) I would wait for morning to see the results...and...Hey presto! Home made bubbles!

                     I hope you enjoyed today's project. I really love to hear your comments,  and have a wonderfully creative day.
                                            Thanks so much for shopping with me!  Vicki  x 💝
                               BUY NOW

Saturday, 20 May 2017

Masked Dauber Dotting Technique. Stampin' Up! Australian Demonstrator.


Hello, and thanks for visiting my blog today. I trust you are enjoying the weekend. We have had some rain here in Sydney today, and I have spent the day in my Happy Place, crafting my little cotton socks off!

I have created a project for you with a technique called Dauber Dotting.

Rather than blending from one shade into the next as you normally would do with a sponge dauber, this technique celebrates the dottiness!


Start by creating the inside of a circle mask using the largest stitched framelits circle. I use Express It Transparent Masking Film, but you could use scrap paper and tape it down with some washi tape. Just be sure to rub your washi onto your clothing first to remove some of the tack, or it still may tear the Shimmery White card stock when you try to remove it.

Start with Daffodil Delight. Blend as usual, but add extra strength dots on top by pounding slightly when you finish blending.  Next add the Peekaboo Peach  and blend as usual, then add pounded dots to the top. Melon Mambo is next. Be sure to start blending off the circle as this is a stronger colour. I did less blending here and more pounding. With Wisteria Wonder blend in from the edge and then pound on top.

Remove the mask and allow to dry. You can speed up the process with your heat gun.


Assemble your card onto a Basic Black card base, and add a Shimmery White layer to the inside, so a message can be written to the recipient of your card.

I stamped the smaller flower from Birthday Blooms #140658  onto the inside layer as well as onto the art piece sponged circle. I do love the inside of my cards to look as lovely as the outside!

                                                          Birthday Blooms  Photopolymer #140658  

I adhered a strip of washi tape from the Pop Of Pink suite down the side edge. Next I stamped the sentiment from the Birthday Blooms Stamp set onto Shimmery White card stock and cut out using the oval framelits. I popped this up on dimensionals and the card was done!

                                I hope you give this a try. Have a good weekend.
                                         
                              Thanks so much for shopping with me!  Vicki  x 💝 
                                                     BUY NOW


Thursday, 18 May 2017

Sneak Peek: Color Theory Suite.

Hello, and thanks for visiting my blog.
Today I have a SNEAK PEEK for you! This coordinating set is a suite for all seasons.
From June 1st, you will be able to order a whole swag of new stamps, embellishments and crafting goodness! Aren't these cards so pretty?
Watch the video and put these on your wish list. You will be able to purchase these from me from June 1st, and I will have the new catalogue download on my blog for you to browse through. I am also planning a new catalogue Walk Through on my Aussie Stampers Youtube Channel to highlight my favourite things. 


Watch the Video


                                     Thanks so much for shopping with me!  Vicki  x 💝

Monday, 15 May 2017

Remarkable Rock and Roll Technique. Stampin' Up! Australian Demonstrator

                                             
                                                      Hello, and welcome to my blog.
 The Remarkable You Stamp Set (Wood Mount #139891 Clear Mount #139894) has a beautiful leaf image that I wanted to use in a different way, so I designed a card to demonstrate the "Rock and Roll" technique. You can see in the photo that the leaves have 2 different colours.

When you are doing this technique, start by inking the stamp in the lighter colour first, (in this case Bermuda Bay), then without cleaning the stamp, leave the stamp facing upwards on your desk and roll some darker colour (in this case Island Indigo) onto the back of the stamp, and rock the darker colour over the lighter colour. You don't want to cover up the lighter colour completely, just add some highlights.
                                               
This will give a really pretty effect.

 I masked off the bottom of the stems, or you could simply cut the card stock in half and hide the join under the black banner, which is popped up on dimensionals.


 I also wanted to use the sentiment "every heart needs someone to love" from the Falling For You stamp set #143109, which has a coordinating sentiment for the inside of the card that says " you're my person." How adorable is that!
I heat embossed the image onto Basic Black card stock using white embossing powder, and mounted the art pieces onto a basic black card base.

Here is the inside of the card.


I used my copic marker BG13 to colour 2 large, 2 medium and 2 small rhinestones (make sure you let them dry before using them) to finish the card.
I like to make the inside as pretty as the outside when I make a card. If you are decorating inside make sure to adhere a plain whisper white layer above your art piece on the inside of the card to write your message on.


That's all for today. I hope you enjoy my projects, and I love your comments :)

Have a creative day. 
 Thanks so much for shopping with me!  Vicki  x 💝

Remarkable You  Stamp Set   Wood Mount 139891   Clear Mount 139894

Falling For You Stamp Set   Wood Mount 143106   Clear Mount 143109


Saturday, 13 May 2017

Copper WOW! Card with the Pansy Punch. Stampin' Up! Australian Demonstrator.


Hello, and welcome to my blog.
 I have been on the river today, and had an unintended swim off the end of our wharf when I capsized the kayak while trying to get in! Very funny, and the river was surprisingly warm. I was fully clothed, which made it even funnier, and I managed to keep my sunglasses and baseball cap on, in spite of being dunked underwater! After a nice warm bath (yes, I still went kayaking in my wet, wet clothes), when Paul and I got back, I decided some crafting was in order, and I came up with this lovely little number. I am quite pleased with how it turned out. What do you think?


I am happy to say the pansy punch is carrying over into the new catalogue, and I decided to team it with the "Affectionately Yours" #141632 Designer Series Paper. The copper accents in the paper were a perfect pairing with some copper foil, and I used the Pretty Pines Thinlit dies #141851 as foliage. I have paired these leaves and buds with flowers before and they work really well.  


Here is a close-up of the flowers, which were layered up on dimensionals, after a little shaping. I punched out 2 half inch circles for the centres, and used Night of Navy Card stock and ink to layer it all onto a crumb cake card stock base. The sentiment is from the Paisleys and Posies stamp set #142196, and the Navy pansy was stamped with "Flower Shop" #130942 before being punched out.


                                           That's all for today, and thanks for stopping by.


  Thanks so much for shopping with me!  Vicki  x 💝