Showing posts with label Birthday Blooms. Show all posts

Sunday, 4 June 2017

Birthday Blooms Two Ways. Australian Stampin' Up! Demonstrator

Hello, and thanks for visiting my blog today!
Here are 2 cards I put together using different techniques. I made the first card  on Stampin' Up! Shimmery white paper, which I had lightly spritzed with water and matted it to a DSP background


I stamped a separate piece of card stock with the sentiment and popped it up on dimensionals, then added 3 small rhinestones that I had coloured with Copic markers and left to dry.


For the second card I used a vellum overlay, after stamping the image as a background . I white embossed the vellum, then added a Tempting Turquoise piece of card underneath so the greeting would show through. I attached the vellum to the top of the card using Washi Tape and I mounted it all onto a thick white card stock base. I fussy cut another bloom I had stamped and lightly spritzed and adhered it to the vellum as the focal image. I love how the background peeks through!


 I hope you enjoyed today's project. Have a great weekend.
Thanks so much for shopping with me1
Vicki x 💝

Sunday, 28 May 2017

Canvas Art with Felt and Birthday Blooms. Australian Stampin' Up! Demonstrator


Hello, and thanks for stopping by my blog today.
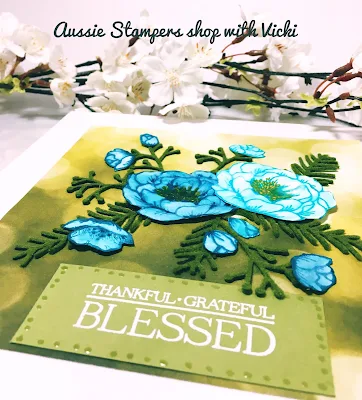
I love working on canvases. The work we do as card makers and paper crafters is often more art than card, and in this case I wanted to try something that I could use as a home decor piece. 


The stamp set Birthday Blooms is one of my absolute favourite sets for colouring. I used Shimmery White card stock, and stamped half of the blooms in Tempting Turquoise ink, and the other half in Dapper Denim ink.

I coloured inside the petals using a number 2 round brush and used the squeezed-together ink pads as my palette, drawing some of the colour from the stamped lines to soften the edges.

After the flowers had dried, I added some Crushed Curry with my marker to the centre of the two large blooms.

I cut out all the blossoms, and used some olive green felt to cut out the leaves with the Pretty Pines thinlits dies.

I adhered everything onto a 6" x 6" piece of Serene Scenery Designer Series Paper with the lovely Bokeh Pattern, which I had adhered to an 8" x 8" pre - primed canvas.
I  popped up a sentiment, "Thankful Grateful Blessed" from the Paisleys and Petals stamp set, which I had white heat embossed onto an old olive piece of card stock.

To give everything a shimmer, I added accents with a clear Jelly Roll gel pen.


This art piece now has pride of place in my entry way, and I love it!

Thanks for visiting. I hope you like this project idea.
Vicki x  💝

Saturday, 20 May 2017

Masked Dauber Dotting Technique. Stampin' Up! Australian Demonstrator.


Hello, and thanks for visiting my blog today. I trust you are enjoying the weekend. We have had some rain here in Sydney today, and I have spent the day in my Happy Place, crafting my little cotton socks off!

I have created a project for you with a technique called Dauber Dotting.

Rather than blending from one shade into the next as you normally would do with a sponge dauber, this technique celebrates the dottiness!


Start by creating the inside of a circle mask using the largest stitched framelits circle. I use Express It Transparent Masking Film, but you could use scrap paper and tape it down with some washi tape. Just be sure to rub your washi onto your clothing first to remove some of the tack, or it still may tear the Shimmery White card stock when you try to remove it.

Start with Daffodil Delight. Blend as usual, but add extra strength dots on top by pounding slightly when you finish blending.  Next add the Peekaboo Peach  and blend as usual, then add pounded dots to the top. Melon Mambo is next. Be sure to start blending off the circle as this is a stronger colour. I did less blending here and more pounding. With Wisteria Wonder blend in from the edge and then pound on top.

Remove the mask and allow to dry. You can speed up the process with your heat gun.


Assemble your card onto a Basic Black card base, and add a Shimmery White layer to the inside, so a message can be written to the recipient of your card.

I stamped the smaller flower from Birthday Blooms #140658  onto the inside layer as well as onto the art piece sponged circle. I do love the inside of my cards to look as lovely as the outside!

                                                          Birthday Blooms  Photopolymer #140658  

I adhered a strip of washi tape from the Pop Of Pink suite down the side edge. Next I stamped the sentiment from the Birthday Blooms Stamp set onto Shimmery White card stock and cut out using the oval framelits. I popped this up on dimensionals and the card was done!

                                I hope you give this a try. Have a good weekend.
                                         
                              Thanks so much for shopping with me!  Vicki  x 💝 
                                                     BUY NOW