Showing posts with label watercoloring. Show all posts

Sunday, 4 June 2017

Birthday Blooms Two Ways. Australian Stampin' Up! Demonstrator

Hello, and thanks for visiting my blog today!
Here are 2 cards I put together using different techniques. I made the first card  on Stampin' Up! Shimmery white paper, which I had lightly spritzed with water and matted it to a DSP background


I stamped a separate piece of card stock with the sentiment and popped it up on dimensionals, then added 3 small rhinestones that I had coloured with Copic markers and left to dry.


For the second card I used a vellum overlay, after stamping the image as a background . I white embossed the vellum, then added a Tempting Turquoise piece of card underneath so the greeting would show through. I attached the vellum to the top of the card using Washi Tape and I mounted it all onto a thick white card stock base. I fussy cut another bloom I had stamped and lightly spritzed and adhered it to the vellum as the focal image. I love how the background peeks through!


 I hope you enjoyed today's project. Have a great weekend.
Thanks so much for shopping with me1
Vicki x 💝

Sunday, 28 May 2017

Canvas Art with Felt and Birthday Blooms. Australian Stampin' Up! Demonstrator


Hello, and thanks for stopping by my blog today.
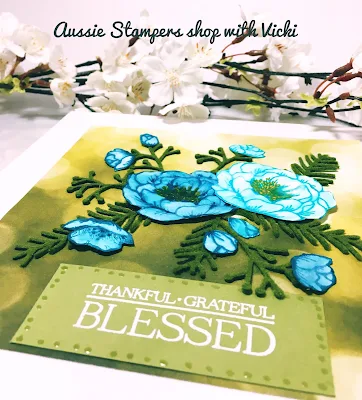
I love working on canvases. The work we do as card makers and paper crafters is often more art than card, and in this case I wanted to try something that I could use as a home decor piece. 


The stamp set Birthday Blooms is one of my absolute favourite sets for colouring. I used Shimmery White card stock, and stamped half of the blooms in Tempting Turquoise ink, and the other half in Dapper Denim ink.

I coloured inside the petals using a number 2 round brush and used the squeezed-together ink pads as my palette, drawing some of the colour from the stamped lines to soften the edges.

After the flowers had dried, I added some Crushed Curry with my marker to the centre of the two large blooms.

I cut out all the blossoms, and used some olive green felt to cut out the leaves with the Pretty Pines thinlits dies.

I adhered everything onto a 6" x 6" piece of Serene Scenery Designer Series Paper with the lovely Bokeh Pattern, which I had adhered to an 8" x 8" pre - primed canvas.
I  popped up a sentiment, "Thankful Grateful Blessed" from the Paisleys and Petals stamp set, which I had white heat embossed onto an old olive piece of card stock.

To give everything a shimmer, I added accents with a clear Jelly Roll gel pen.


This art piece now has pride of place in my entry way, and I love it!

Thanks for visiting. I hope you like this project idea.
Vicki x  💝