Tuesday, 5 July 2016

Foxy Friends and Fairies! Stampin' Up! Australian Demonstrator.

I love this stamp set. It's perfect for a little princess. I paired it with the designer series paper "a little foxy" and decided to try 2 different colour ways using the toadstool paper. 


 This second card is so pretty in real life. The monotone basic grey and smokey slate work so well with the silver satin ribbon. I embossed the message using white embossing powder and it looks elegant and very sweet.


Watch the video tutorial for both these cards here.

Wednesday, 29 June 2016

Get Well Soup . A Cure for the Winter Sniffles.

Winter has well and truly arrived in Sydney this week, with snow falls on the Blue Mountains and chilly winds. Here is a get well card that will put a smile on your face. This single image rubber stamp can be used in a multitude of ways. This card is simple and quick to make using limited supplies.

Stamp the Get Well Soup stamp in basic Black ink and colour the bowl with a little Wisteria Wonder ink and an Aqua Painter. Cut out using the Oval Framelits, and pop up on dimensionals onto some co-ordinating Designer Series Paper. Tie a double length of Whisper White Bakers Twine around your paper and adhere to a Whisper White Card Base.

Friday, 24 June 2016

Gift Cards are Always in Style! Stampin' Up! Australian Demonstrator


I do love giving gifts (and receiving them too!) but it's not always easy deciding on the perfect gift for that someone special.

When you can't decide what to give someone, gift cards are a good alternative. 
This stamp set has so many appropriate and funny sayings to cover every occasion.
17 photopolymer stamps #137159  $43.00AUD
Purchase yours today at www.AussieStampers.stampinup.net


Thursday, 16 June 2016

Watercolour Masterclass. Fairy Celebration. Stampin' Up! Australia


I have made a video tutorial for you showing how to achieve these soft and subtle effects using ink and a water brush and fine paintbrush. I love painting and colouring and find it so therapeutic at the end of a busy day to sit quietly and create little art pieces like this card.
I hope you enjoy the video! A full list of supplies is listed below.
Vicki x
The Fairy Celebration Stamp set # 141551 wood mount or #141554 clear mount 
is ideal for colouring, either with pencils,  markers, copics or watercolours! 
Here are the supplies I used to create my card:
Archival Gray Ink
Ink pads:
Rose Red (toadstool and lips)
Sweet Sugarplum (poppies)
Pink Pirouette (skin and poppies)
Crushed Curry and So Saffron (dress)
Wild Wasabi (grasses and stem of flowers)
Soft Sky (wings and sky)
You will also need Stampin' Up! Watercolour paper, The Clear Wink of Stella Brush, an Aqua Painter, a glass of water, paper towel folded in quarters, a round number 6 brush and Tombow Multi Adhesive.


Tuesday, 14 June 2016

Adorable Love Note Card . Stampin' Up! Australia


Hello, today's project is all about the layers!
Here are the supplies you will need to make this project.

Stamps
• Flourishing Phrases Stamp Set wood mount #141531 Clear Mount #141534

Paper
• Calypso Coral, Pear Pizzazz, and Whisper White Cardstock
• Paper Doilies

Ink
• Sweet Sugarplum Classic Stampin’ Pad® 
• Subtles Stampin’ Write® Markers

Stampin’ Up! Accessories
• Gold Metallic Thread
• Metallics Sequin Assortment
• Fine Tip Glue Pen
• Stampin’ Dimensionals® 
• Fast Fuse Adhesive
• Big Shot™
• Precision Base Plate
• Flourish Thinlits™

Thanks for visiting my blog, and have a wonderfully creative day!

Vicki x  💝

Monday, 13 June 2016

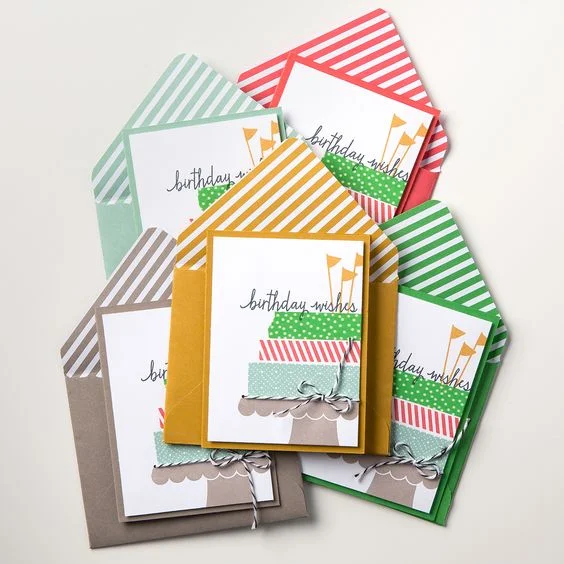
Birthday wishes with Build A Birthday Stamp.

This versatile stamp set lets you build cakes in any colour combination. 
This project uses the 5 In Colours:
Tip Top Taupe, Cucumber Crush, Mint Macaron, Watermelon Wonder and Delightful Dijon, and you can make matching envelopes with the envelope punch board and envelope paper! 
 Build A Birthday Photopolymer #138646 AUD$28.00 available from www.AussieStampers.stampinup.net


For the tag, you will need the scalloped tag topper punch. Stamp your candles using the "cake" layers. in Cucumber Crush, Real Red and Pool Party. Crushed Curry for the flames and striped piece and Whisper White Bakers Twine. Stamp your greeting in Crumb Cake ink.

For the window card, use the circle thinlits to cut out the circle on the front of a Crushed Curry card base. Layer a piece of Whisper white card stock inside the card, then stamp the cake pieces. The bottom layer of the cake is Designer Series Paper. You can make the stamped  flags using the Triple banner punch to flag the ends of the card stock. Stamp the greeting in crumb cake and flag the ends. Tie Whisper White bakers twine around the top and finish with a bow.
Happy Crafting!
Vicki 


Thursday, 9 June 2016

Gift box Project. #Stampinup


I love the way the timeless Textures stamp set gives this box a rustic feel, and you don't have to be too accurate in lining up the stamp each time as it's quite a random look you're after with this effect.
Here are the supplies you will need for this project.

Stamps
• Teeny Tiny Wishes and Touches of Texture Stamp Sets

Paper
• Crumb Cake, Calypso Coral, and Whisper White Cardstock

Ink
• Crumb Cake, Calypso Coral, Peekaboo Peach, and Pool Party Classic Stampin’ Pads® 

Stampin’ Up! Accessories
• Peekaboo Peach 3/8" Ruched Ribbon 
• Gold Clips
• Fine Tip Glue Pen
• Stampin’ Dimensionals® 
• Big Shot™
• Magnetic Platform
• Lots of Labels Framelits™
• Gift Box Punch Board

Tuesday, 7 June 2016

Even More Projects with the Fox Builder punch


These critters are adorable! 
The little racoon is a bookmark.
What child wouldn't appreciate these little cuties?

Bundle & Save 10%
Foxy Friends Stamp Set and Fox Builder Punch 
Item # 142326 AUD$70.00

Thanks for stopping by my blog!
Vicki x  💝

Monday, 6 June 2016

More projects with the Fox Builder Punch


Bundle and Save 10%
Foxy Friends Stamp Set & Fox Builder Punch Photopolymer #142326  $AUD70.00
Shop at www.AussieStampers.stampinup.net


Make a Frame of Critters, the perfect gift for a child's bedroom! 
I often pick up frames when I'm out shopping  and see them on sale. 
The little animals here are Smokey Slate with Basic Grey stripes, Sahara Sand & Whisper White, Early Espresso & Tip Top Taupe, Calypso Coral & Whisper White, and Basic Black & white.  The tiny hearts are punched out in Calypso Coral using the Confetti Hearts Punch.
If you love punches, then this set is a must!
Happy crafting,
Vicki x 💝

Sunday, 5 June 2016

Foxy Friends and Fox Builder Punch by Stampin’ Up!


This cute little builder punch will give you the option of several other little critters as well as the fox. Watch this tip on how to line up the punch to stamp then punch all the pieces at the same time.
Order yours over in my store www.Aussiestampers.stampinup.net


Foxy Friends 29 photopolymer stamps
#141549 AUD$47.00
Fox Builder punch #141470 AUD$31.00
Of bundle and save 10%   Foxy Friends stamp set
& Fox builder punch #142326 $AUD70.00

Thanks for visiting my blog today!
Vicki  x 💝 

Friday, 3 June 2016

Joyful Watercolour Card with Framelits. Stampin' Up!

I was so happy with how this card turned out. I started with shimmery white card stock as the base. It holds up well under watercoloring. I used tempting turquoise and melon mambo inks with a quick background wash, then let it dry. Next I cut out the dies from Butterflies Thinlits and Wonderful Wreath and added some transparent blue sequins. The result is a very pretty and joyful card. 


Thursday, 2 June 2016

Join Stampin' Up! in June for bonus extras! Stampin' Up! Australia.


Join my team in June and you will get TWO FREE stamp sets of any value from the catalogue for the same low price of only $169.
Go to www.AussieStampers.stampinup.net and click on "join." This is a really sweet deal, and remember, it's only for the month of June!


FAQ about becoming a demonstrator

1. What are the minimum sales requirements?

You only need to submit $400 in sales per quarter. That is less than an average Stampin’ Up!® workshop! Also, you can submit your sales in any increment you wish and still receive your 20 percent discount and commission.

2. What if I want to do this as a hobby and not necessarily a business?

Stampin’ Up! supports all demonstrators, no matter their goals or the level at which they choose to run their business. If you choose not to hold workshops, you can simply place your own orders and/or collect orders from family and friends to equal the $400 quarterly sales minimum.

3. Can I be my own hostess?

Yes, you can be your own hostess anytime you want. Invite your family and friends into your home and have a workshop. You will be the hostess, receiving the hostess benefits, as well as the demonstrator, receiving your instant income and commission.

4. How much does it cost to get started as a demonstrator?

The Starter Kit is only $169 (postage is included), and is fully customisable. You choose up to $235 worth of any current Stampin’ Up! products and you will also receive a business supplies pack, containing materials you need to run your business (valued at $80).

5. How can I make money as a demonstrator?

You can earn money in three ways: instant income (20 percent of each order), monthly volume rebates (4-15 percent of total sales), and monthly downline override commissions (2 to 6.5 percent of your recruits’ sales).

6. Do I have to recruit other demonstrators?

No. If you were to recruit demonstrators, you would be paid override commissions on your downline’s sales, but this is a perk, not a requirement.

7. Where will I get project ideas for my workshops? What kind of training can I expect?

Stampin’ Up! provides dozens of training resources filled with project ideas and tips to help you run every aspect of your business, including a monthly publication called Impressions®, Demonstrator Support agents, a demonstrator-only website, hundreds of samples, annual and seasonal catalogues, a training DVD, the Demonstrator Manual, and a Product Guide.

8. Is Stampin’ Up! a well-known, respected company?

Since 1988, Stampin’ Up! has been selling rubber stamps and paper-crafting supplies. In that time, not only have they won industry awards and accolades, but also the loyalty and admiration of demonstrators and customers alike. And that is a trend that we work hard to maintain. You can rest assured that the reputation of Stampin’ Up! will only continue to improve!

9. What if I decide that I don’t like it once I’ve started? Will I be penalised if I quit?

You may choose to stop at anytime, and you will not be penalized. You simply stop placing orders. However, there are many benefits to remaining an active demonstrator.
                                         

Join Stampin' Up! at www.AussieStampers.stampinup.net

Case-ing The New Catalogue. #Stampinupaustraliandemonstrator


Here're the measurements and supplies you will need for the "Celebrate Today" card I CASED (copied and shared everything) from the new catalogue.

Smokey Slate card base 8 1/4" (21 cm) x 5 3/4" (14.6 cm)
Smokey slate layering piece  5 11/16" (14.5 cm) x 4" (10.2 cm)
Designer Series Paper (neutrals paper stack) 3 7/8"(9.8 cm) x 2 3/4" (7cm)
Whisper white cut to the same measurements


Celebrate Today Stamp Set #137138
Clear blocks D & H
Inks: Flirty Flamingo, Watermelon Wonder, Cucumber Crush
Handheld stapler
Whisper White Twine
Rhinestones
Embossing folder Elegant Dots
Mini glue dots
Snail Adhesive
Whisper White envelope
Blending Pen
 Bone folder

The New In Colours and You've Got This. Stampin' Up!

 I have made a selection of cards using the new In Colours: Emerald Envy, Sweet Sugarplum, Dapper Denim, Peekaboo Peach and Flirty Flamingo. The stamp set is a firm favourite of mine, "You've Got This" I love the image and all the sentiments. I have chosen co-ordinating inks to showcase the beautiful flower image, but you could also use the stamping off technique for the background image.

Here are the supplies you will need, along with Whisper White cardstock and your choice of adhesive:
Stamp Set "You've Got This" wood #139572 Clear #139575 (page 50)  
2016 -2018 In colour ink pad collection #141818 (page 169)
2016-2018 In Colour A4 cardstock collection #141434 (page 169)


Wednesday, 1 June 2016

New Catalog Walkthrough. Stampin' Up!


I have made you a walkthrough of the new Stampin' Up! Catalog, showing you the new product suites. You can order now from my online store; www.AussieStampers.stampinup.net
and if you want to see the catalog, just click on the picture on the top right hand side of the blog.

Designer Tin of Cards by Stampin’ Up!


Here is the Designer tin of Cards from the new catalogue.
See the new catalogue live at www.AussieStampers.stampinup.net or simply click the picture in the top right of this blog.

Most Amazing Card Kit EVER. Large Cards. Stampin' Up! Australia


Here is a tutorial on how to put together the largest sized cards in the "Oh Happy Day" all-inclusive card kit, available tomorrow (1st June) in my online store:  www.AussieStampers.stampinup.net
Scroll back through my earlier posts, and you will find tutorials on all of the remaining cards in this kit.

Friday, 27 May 2016

Bakers Box Artfully Adorned. Stampin' Up!

This sweet little box was made using the Bakers Box Die #138279 and some extra embellishments I had in my stash, along with a retiring punch.
I enjoy having a day using up "leftovers" for my own personal projects when I need a gift for that special someone.  It's fun re-visiting old stamps and punches, ribbons and trim and seeing what I can come up with.


Free Gift for June. Stampin' Up! Australia


I am giving away a notecard wallet for all my June customers!
To receive your wallet from me, please remember not to check the "no contact" option when you place your order, so I can contact you to post out your gift.

This wallet fits the notecards and envelopes perfectly, and will hold 6 single layer cards and 6 envelopes!
Once you have received your wallet, you can use it as a template to make more of these.
The score lines for the wallet are :
2", turn 90 degrees
2 1/2", turn
2", turn
3 3/4 "
Now turn back 90 degrees in the opposite direction and score at 5 3/4" and 6 1/4" to make the spine.


Thursday, 26 May 2016

Balloon Celebration and Matching Punch.


The Balloon Celebration Stamp Set lends itself to lovely soft images: here I have simply pierced the edges of the card with a paper piercer to add to the ethereal feel . 
Balloon Celebration   #140675
Balloon Bouquet Punch # 140609


Wednesday, 25 May 2016

Using masks and embossing for backgrounds.

The background piece on top was made by watercoloring a mix of colours then running the page through an embossing folder and spritzing well with water. this flattened out the embossing, but left a pretty design on the surface.  The other 2 pieces were made by sponging over decorative masks. I spritzed the pink and blue piece on the left with water, and left the blue piece on the right untouched as I wanted to accent the ombre effect of different hues of sponged link.

Sneak Peek Thoughtful Banners Bundle. Stampin' Up! Australia


Here is a sneak peek of the new stamp set and punch combo, that will be available in my store on June 1st.

Sunday, 22 May 2016

Case-ing the Catty... "Gift From the Garden".


Here is a card I CASED (copy and share everything) from the Annual Catalogue, using the "Gift From the Garden" stamp set. It is stamped onto Very Vanilla Cardstock using Old Olive, Mint Macaron and Rose Red inks, with the words stamped in Tuxedo Momento black ink ( my absolute favourite black ink). I used the Washi Punch to punch out the strips and adhered them with snail adhesive.  A simple bow using linen thread is the finishing touch.

Desk Top Card Organiser using the Gift Box Punch Board. Stampin' Up! Aus...


Here is a nifty card organiser made with the gift box punch board. I have changed the design to incorporate a taller, more sturdy box to hold items on your desk.

Saturday, 21 May 2016

Retiring Favourites: Day 6 with Techniques. Stampin' Up! Australia

 How's this for a cute baby combo? I was so thrilled to "accidentally" discover this new technique while I was making the first card...I was able to re-use the framelit mask to make a second card. I am christening it "the layered Die cut Technique!" Scroll down to the video below for the tutorial.