
See my recommendations & links for the best ART & CRAFT SUPPLIES
Showing posts with label #AussieStampers. Sneak Peeks. Show all posts
Showing posts with label #AussieStampers. Sneak Peeks. Show all posts
Wednesday, 25 April 2018
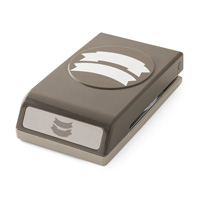
Sneak Peek Stampin' Up! 2018-2019 Annual Catalog : Punch Haul!
Stampin' Up! 2018-2019 Annual Catalog Sneak Peek.
Here are some of the punches that are carrying over into the new catalog.
Thursday, 18 May 2017
Sneak Peek: Color Theory Suite.
Hello, and thanks for visiting my blog.
Today I have a SNEAK PEEK for you! This coordinating set is a suite for all seasons.
From June 1st, you will be able to order a whole swag of new stamps, embellishments and crafting goodness! Aren't these cards so pretty?
Watch the video and put these on your wish list. You will be able to purchase these from me from June 1st, and I will have the new catalogue download on my blog for you to browse through. I am also planning a new catalogue Walk Through on my Aussie Stampers Youtube Channel to highlight my favourite things.

Watch the Video
Thanks so much for shopping with me! Vicki x 💝
Monday, 8 May 2017
You're Sublime : 2 Cards. Stampin' Up! Australia.

You're Sublime #138737 wood Mount #139309 Clear mount

Who doesn't love a vintage caravan? This card is fun and carefree, just like the sentiment!
*Layer some mint macaron Designer Series paper #138432 onto a Whisper White Card base.
*Stamp the image onto a Whisper White piece using Basic Black Archival ink
* Colour using markers and a blender pen in So Saffron, Mint Macaron, Basic Black and Calypso Coral
*Attach to the card front with liquid glue and add 2 torn strips of black wash tape
* Punch out 3 hearts from Calypso Coral Card Stock with the Confetti Hearts Border Punch and attach with snail adhesive.
* Finish with a bow in black and white bakers twine, adhered with a mini glue dot.

This simple card is another pretty combination of colours, and you can make your own co-ordinating envelopes with the Envelope Punch Board #133774 using envelope paper #141697 or Designer Series Paper #138432
This card is made using the same technique as the first, with the markers colours of
Mint Macaron, Smokey Slate, Daffodil Delight, Old Olive, Blushing Bride and WatermelonWonder.
*You can add a touch of Smokey Slate shadow below the wheelbarrow to "ground" your piece so that it doesn't look as though it's floating on the page.
*Stamp the greeting a second time on a scrap of whisper White
*Use the Duet Banner punch to make the banner, and adhere the banner on top of the stamped greeting.
Duet Banner Punch #141483
Happy crafting, and thanks for visiting!
Thanks so much for shopping with me! Vicki x 💝
Sunday, 7 May 2017
Hostess Sets: Gift of Love Cards. Stampin' Up! Australia.
If you haven't taken a look at the hostess sets on page 198-201 of the catalogue, then you are missing the best buy in stamps! These stamp sets are priced well below retail value and are a great way to spend your Stampin' Rewards.
To make these cards you will need the Hostess stamp set Gift of Love #141796 , $AUD17.00, which can only be purchased with Stampin' Rewards (which you receive after your order totals $250 excluding shipping and handling)


The thing I like the most about this next card is the pretty, soft colour.
*On a panel of Watercolour Paper using your aqua painter do a quick wash of Pink Pirouette and So Saffron inks. Set aside to dry.
*Next stamp Basic Grey archival ink onto a seperate piece of watercolour paper, and using your aqua painter colour the flowers in Pink Pirouette. Add a tiny amount of Rose red in the centres and blend outwards.
*Colour the stems in Old Olive ink. Set aside to dry.
*Come back to the original watercolour washed piece and stamp the greeting in Soft Suede Ink.
*Flick some Soft Suede ink across the page using your aqua painter. Set aside to dry.
*Cut out the floral image with your paper snips.
*Adhere a strip of Very Vanilla Lace Trim #141672 under the greeting with mini glue dots.
*Pop up the floral image on dimensionals.
*Adhere to a Watercolour paper card base with dimensionals.
These are really pretty projects and I hope you give them a try!
Happy Crafting,
Vicki x 💝
To make these cards you will need the Hostess stamp set Gift of Love #141796 , $AUD17.00, which can only be purchased with Stampin' Rewards (which you receive after your order totals $250 excluding shipping and handling)


*On a card base of Basic Black add a panel from the Pop of Pink Specialty Designer Series Paper #141648.
*Add a layering panel of Whisper White, and stamp your image with Basic Black Ink.
*Stamp Daffodil Delight flowers, then Cucumber Crush for the leaves.
*Using an aqua painter, pick up some ink from the lid of your pad and flick some Daffodil Delight across the page.
*Wrap some linen thread around the panel and staple a small edge of doily onto the front.
*Use versamark ink to stamp the greeting on a small piece of basic black card stock, then emboss with white embossing powder (be sure to use your embossing buddy first).
*Adhere all the pieces with fast fuse or snail.

The thing I like the most about this next card is the pretty, soft colour.
*On a panel of Watercolour Paper using your aqua painter do a quick wash of Pink Pirouette and So Saffron inks. Set aside to dry.
*Next stamp Basic Grey archival ink onto a seperate piece of watercolour paper, and using your aqua painter colour the flowers in Pink Pirouette. Add a tiny amount of Rose red in the centres and blend outwards.
*Colour the stems in Old Olive ink. Set aside to dry.
*Come back to the original watercolour washed piece and stamp the greeting in Soft Suede Ink.
*Flick some Soft Suede ink across the page using your aqua painter. Set aside to dry.
*Cut out the floral image with your paper snips.
*Adhere a strip of Very Vanilla Lace Trim #141672 under the greeting with mini glue dots.
*Pop up the floral image on dimensionals.
*Adhere to a Watercolour paper card base with dimensionals.
These are really pretty projects and I hope you give them a try!
Happy Crafting,
Vicki x 💝
Tuesday, 2 May 2017
Using a vellum overlay and how to adhere it to your card.

Hello, and welcome to today's project. Flu season has arrived, and I was down for the count with coughing and sneezing all last week. Luckily for me, Paul took over some of the grocery shopping while I was ill, and kept me well-provided for with lovely cups of tea and sympathy. Gotta love that man!
I love stamping on vellum, and this card using the Get Well Soup stamp uses a couple of neat techniques I wanted to share with you.
Firstly, the background is Designer Series Paper, adhered to a whisper white card base.
The image is stamped in versamark ink, then white embossing powder is sprinkled over the top (remember to swipe the vellum with your embossing buddy first) and heat set using the heat tool. When doing this make sure to heat the back of the paper quickly as well so it doesn't curl up!
Colour the soup with a so saffron marker, then adhere the vellum with a strip of washi tape.
Adhere a thick bakers twine bow with a glue dot or liquid tomboy multi adhesive.
Another way to adhere a vellum overlay would be with some glue dots, and then cover the dots with rhinestones, pearls or enamel embellishments.
I hope you found this helpful.
Have a wonderful day,
Vicki x 💝
Sunday, 30 April 2017
Fruity Gift Bag

Hello my friends, I absolutely love cafe bags....I have used these for giving away goodies in my classes, and they have a nice long, flat front profile so you can really go crazy with a big tag.
Make sure to stock your bag with goodness, then fold over the top and wrap it around, so that it is tightly sealed. Loop some ribbon, then use dimensionals or Tombow to adhere your tag.
This tag is made using the gorgeous Fruit Stand stamp set.

Thanks so much for shopping with me! Vicki x 💝
Saturday, 29 April 2017
From my Garden to Yours
I am a keen gardener and have lots of favourite spots in my garden. It's so peaceful having a place to sit and reflect after a busy day. These are some of my favourite places in our garden.


I also love to give away cuttings to my friends and neighbours, and like to add a card as a thank you for the happiness friends bring into my life. We live in such a close-knit community here, and I love our street! We spend much time socialising, and there is always someone to chat with when I am out walking Koby, our dog.

From the Garden stamp set


Have a wonderfully creative day!
Thanks so much for shopping with me! Vicki x 💝
Wednesday, 19 April 2017
How to Decorate a Gift Box

I love having small gift boxes on hand and I come home from Stamp Camp with so many lovely goodies each year with thoughtful gifts from my stamping friends.
I get some great design ideas from boxes I have seen and these little boxes are just lovely.
Scale is important when decorating small gift boxes, so look out for small-scaled greetings and punches, or small floral die cuts and thin bakers twine, as a large bow may overwhelm the box itself!
Washi tape makes a great closure for your box, as it will not tear the card stock when you remove it to open your gift.
Have a creative, marvellous day!
Vicki x 💝
Saturday, 15 April 2017
Simple Hearts Card: colours with black

I often go to sleep dreaming of cards I am planning to make for my classes!
Black is right on trend for sentiments, and this card shows how to balance a black greeting with bright colours. When you are using fine thinlits like these, make sure to layer some waxed paper between the die and the card stock. It makes extracting the card so much easier.
Have a wonderful day,
Vicki x 💝
Wednesday, 12 April 2017
Loving These Retiring Framelits! Stampin' Up!

This is one of the pretty cards we made in my workshop at Menai Library.
The women who attended really enjoyed the class, and the library staff were so helpful in helping get the word out about my workshop.
It is foolproof stamping and perfect for the beginner stamper as long as you stamp the sentiment first, that way if you mis-stamp you can start over. When using photopolymer stamps it helps to use a Stamping' Pierce mat underneath and hold the stamp down for 3 seconds in order for the ink to be absorbed by the card stock.
One of my favourite co-ordinating retiring stamp and framelits sets is Flower Patch #134207 and #133731.They are available for a limited time.
The sentiments are so lovely, and it is great to be able to use 2 step stamping (on the leaves) in the background, then to be able to pop up layers on top (the flowers). A simple pearl or two is all that is needed to make a sophisticated card.
Happy Crafting!
Vicki x 💝


Flower Patch Stamp Set 134207

flower Fair Framelits 133731
Thanks so much for shopping with me! Vicki x 💝
For the Traveller : Masculine Colour Scheme

I hope your day is going swimmingly. Are you like me and love to find interesting new colour schemes for your projects?
Here is another idea for a masculine colour scheme. The simple twine bow works on this card, although I usually have a rule about "no bling" on a man's card ( yes, we do love our rhinestones and bows!) . The twine is a nod to the colour of the card base and the soft basic grey tones down the calypso coral. It's all about balance and restraint, and I love this card.
Happy {paper💝}crafting !
Vicki x
Tuesday, 11 April 2017
Shop and Save up to 50%!

Stampin' Up! has released the list of products retiring at the end of May. Grab your favourites before they're gone!
Thanks so much for shopping with me! Vicki x 💝
Sunday, 9 April 2017
Another Masculine Colour Scheme

Designing for the men in your life? I am always looking for card ideas for the gorgeous men in my family. Butterflies and blooms are all very well, but sometimes you just need a bit of a blokey card.
This card has been coloured using stampin' write markers and a blending pen. The colours work well with a masculine theme and the design is simple so as not to overwhelm the image.
Colouring by hand is such a therapeutic exercise, and is a great stress-reliever. I pop my markers into a bag when I'm travelling so I have something to keep me busy.
Have a creative day!
Vicki x 💝
Saturday, 8 April 2017
For the Beetles Fans!

Who remembers collecting bugs as a child? My favourites were slaters that roll into a ball when touched. I remember having a little army of these guys living in dirt and leaves in a jar on my bedside table! Beetles & Bugs Photopolymer Stamp Set #14290 | |
| Price: $29.50 | |
This is a Two-Step Stampin’ set. Combine individual stamps to create the final image you want in the colors you want.
Quantity: 32 photopolymer stamps Suggested clear blocks (sold separately): a, b | |
Hop on over to my store: www.AussieStampers.stampinup.net to find these little cuties.
Aren't they perfect for that sweet little boy or girl who loves collecting crawlies in their bug catcher?
Vicki x 💝

Sneak Peek! Eastern Palace Suite
Here is the first of the Sneak Peeks from the new catalogue, and it's all about medallions and very detailed thinlits dies.
It's called the Eastern Palace Suite, and comes with a whole swag of accessories, including these must-have tassels and gold vinyl stickers. Wow!
For a limited time, ( April 4-30) you will be able to choose from starter and premium bundles, suitable for both the beginner and avid crafter.

This time of year is when I go through all my current Stampin' Up! supplies and move the retiring items into a holding bay ready to sell off my pre-loved stamps and accessories to those lucky early birds who are keen to score a grab bag of discounted stamping goodness.
It is also an EXCELLENT time to have a really good clear out and de-clutter of my craft room, which I must say is looking packed to the gills with stuff LOL.
Have a marvellously creative day!
Vicki x 💝
Friday, 7 April 2017
You Are My Sunshine Card.

Hello my friends, I hope you are enjoying my blog posts. I have some more colour combos for you today. Sunshiny colours for a sunshiny day!
It's beautiful weather here in Sydney, and although we don't really have seasons to speak of, as the weather is pretty fine all your round, it's nice to see the sun after some cloudy days.
I love a versatile stamp set, and this one has so many different ways to combine the thinlits and stamps , and makes designing your card super-easy as the words take pride of place.

Hop on over to my store www.AussieStampers.stampinup.net to purchase this lovely set.
Have a marvellous day,
Vicki x 💝
Happy Birthday Using the Fry Box Die. Stampin' Up! Australian Demonstrator

Will you have fries with that?
This versatile gift box uses the Fry Box Framelits, and is perfect paired with a cello bag of lollies. It's so good to be able to make something that is quick and easy, yet has a wow factor of cuteness! Here are the supplies you will need to make this project.
Stamps
• Amazing Birthday Stamp Set
Paper
• Pistachio Pudding Cardstock
• Whisper White Cardstock
• All Abloom Designer Series Paper Stack
Ink
• Lost Lagoon Classic Stampin’ Pad
• Pistachio Pudding Classic Stampin’ Pad
Stampin’ Up! Accessories
• Gusseted Cellophane Bags
• Pistachio Pudding Thick Baker’s Twine
• Stampin’ Dimensionals
• 1-1/4" Circle Punch
• Big Shot
• Fry Box Bigz L Die
Everything is available from my store: www.AussieStampers.stampinup.net
Happy Stamping!
Vicki x 💝
Pop of Paradise : Flamingos at my Wedding!

A little birdie told me there will be flamingos (yes, real live ones!) at our wedding in September.
(Paul and I are tying the knot after 5 years of happy times together).
I will have to pop a flamingo card or two into my luggage just for fun, as I want to have some thank you cards on hand for our wedding vendors, and for the hotel staff.
The pop of paradise suite is such a fun combination, and Flirty Flamingo ink is obviously the perfect choice for this cheeky bird.
The images on the stamp set are perfect for our wedding, too, and I love the sentiment "a very special day" as our wedding day will indeed be special!
Have a creative ind inspiring day.
Vicki x 💝


Pop of Paradise #141581
Dragonfly Card : Dragonfly Thinlits Bundle.
Dragonflies are buzzing around my garden pond at the moment, and I still have 2 waterlilies in bloom even though the weather is much cooler at night here on the river.


Here is a card made using the Dragonflies stamp set, cut out using the matching thinlits.
The vellum has been stamped and heat set using gold embossing powder to give a gossamer effect, just like you might see on a dragonfly's wings!
Vicki x 💝

Stamps
• Dragonfly Dreams Stamp Set*
Paper
• Tip Top Taupe Cardstock
• Vellum Cardstock
• Whisper White Cardstock
• Succulent Garden Designer Series Paper Stack*
• Delicate White Doilies
Ink
• Calypso Coral Classic Stampin’ Pad®
• Tip Top Taupe Classic Stampin’ Pad
• VersaMark Pad™
Accessories and Tools
• Gold Stampin' Emboss®Powder
• 3/8" (1 cm) Metallic Ribbon Combo Pack**
• Metallics Sequin Assortment
• Stampin’ Dimensionals®
• Big Shot™
• Banners Framelits™Dies
• Large Numbers Framelits Dies
• Detailed Dragonfly Thinlits™ Dies*


Wednesday, 5 April 2017
Masculine Cards for the Beach Lover.


High Tide Photopolymer Stamp Set Item number 143006 Price: $45.00
Stampin' Up! certainly provide us with so many inspiring products, and the colour coordination makes putting your projects together so easy. I am going to get cracking making my own versions of these for my sons as well.
Below I have added a photo of the view from my home studio where we make cards and paper crafts.
Inspiring, right?
Have a wonderfully creative day, and thank you for visiting my blog.
Vicki x 💝


Subscribe to:
Posts (Atom)