
See my recommendations & links for the best ART & CRAFT SUPPLIES
Friday, 28 September 2012
9 Halloween Projects...ONE Stamp Set!

Lucky Limeade and Tangerine Tango layering cardstock
Basic Black cardstock punched out using 2 3/8" Scallop punch, then cut in half.
Stamp the Mummy image onto the tag using Stazon Black ink
Layer the black pieces under a tag from the Ghoulish Googlies Bundle (page 27 of the Holiday Catalog)
Stick on a googly eye.
Add Dazzling Details Silver Sparkle to his eye socket
Adhere everything with Snail adhesive.

SUPPLIES: Ghoulish Googlies Bundle
Stamp the spider from the Googly Ghouls Stamp onto the round tag.
Use the 2 3/8" Scallop punch to punch out a piece of Tangerine Tango cardstock.
Adhere the tag with Snail adhesive.
Use the Spiderweb Embossing Folder to emboss the Glassine Bag with the Big Shot.
Pierce a small hole in the top of the bag and tie the tag to the bag with Pumpkin Pie Bakers Twine.

Cut the edge with the Finishing Touches Edgelit using the Big Shot.
Stamp the witch in Black Stazon ink.
Stamp the Mummies in Basic Grey ink.
Add a Googly eye to the mummies.
Paint their tummies with dazzling details adhesive glitter.
Stamp the word "Boooo" in black Stazon.

Cut the edge with the Finishing Touches Edgelit using the Big Shot.
Stamp the witch in Black Stazon ink.
Stamp the spiders at different heights on one side of the witch.
Using a ruler draw a line of straight dots for the webs using a basic black marvellous marker
Stamp the bats at an angle.
Cut a template into a cloud shape and sponge Basic Grey ink using a sponge Dauber (avoid the eyes)
Colour the witch using a certainly celery marker.
Using Snail, adhere a piece of certainly celery cardstock 14.5cm x 7cm under the top piece, making sure you line up the edges.
Stamp "happy birthday" from the "Best Dad Ever" stampset in stazon black ink

Tag from Ghoulish Googlies Bundle
Frankenstein Stamp, stamped in Stazon Black ink
Colour his face with Certainly Celery or Lucky Limeade marker
Use a bone folder to curve the label so it sits snug against the jar.
Adhere with Tombow Multi Adhesive.
Tie Striped Satin Ribbon (page 26 of the holiday catalogue) below the lid and leave 2 long ends.
Fill with cashews or lollies.


SUPPLIES: 6 x 7.9cm Square Envelopes (page 160 of the 2012 - 2013 Catalogue)
6 pieces Whisper White cardstock cut to 7.5cm x 15cm and folded in half
Stamp 2 of each witch, Mummy and Frankenstein onto the card fronts in Basic Grey Ink
Colour in the details using Tangerine Tango, Certainly Celery and Basic black Markers
Adhere Googly Eyes.
Make a basic box big enough to fit the envelopes and cards using Tangerine Tango card stock for the base and Howlstooth and Scaringbone Designer Series Paper for the lid ( page 24 of the Holiday Catalogue)
Make a belly band out of the 1/2" Striped Satin Ribbon (page 26 of the Holiday Catalogue) by tying it in a bow around the box.

Adhere Googly Eyes.
Stamp the bat for the lid and attach with a rhinestone brad, coloured black with a Sharpie pen.


Stamp the spider from the Googly Ghouls in Basic Black ink onto the Round Tag from the Ghoulish Googlies Bundle
Punch out two scallop circles in Tangerine Tango and Howlstooth and Scaringbone DSP using the 2 3/;8" Scallop Punch.
Use Snail adhesive to adhere to inside the base and on top of the lid.
Use sticky strip to attach Striped Satin Ribbon (page 26 of the Holiday Catalogue) to the sides of the container.
Fill with tic tacs or small lollies.

Basic Black cardstock for the layering piece, run through the Big Shot using the Spider Web Embossing Folder.
Attach a wide strip of Howlstooth and Scaringbone Designer Series Paper around the de-bossed Basic Black piece and adhere to the card base with Tombow Multi adhesive.
Stamp the witch onto Tangerine Tango Card and punch out with the 2 3/8" Scallop punch.
Colour her hat buckle with Dazzling Details glitter adhesive.
Use Crystal Effects on her buttons and boots.
Adhere a small Rhinestone Basic Jewel onto the spider and colour black with a Sharpie pen.
Draw white dots around the scallop with a Uniball Signo Gel Pen
Adhere to the strip of DSP with 2 Stampin' Dimensionals.
Sydney Card Making Classes - Stampin' Up!
Our next - Stampin' Up! classes are on Tuesday October 2nd in St Peters, Sydney.
Afternoon Class 12.30-2.30pm
Evening Class 7.30-9.30pm
To see all the details and to register go to www.meetup.com/Sydney-Arts-and-Crafts-Group

The Tuesday night class is "Halloween"
The Tuesday afternoon class is "Baby cards and hand coloured Teddy Bears"


Thursday, 27 September 2012
Peace Card - Stampin' Up!

As a meditation teacher, I often use peace as a theme with my students, and it's a sentiment that can be used all year round, not just at Christmas.
This card also features the - Stampin' Up!Elegant Butterfly Punch. It co-ordinates perfectly with the - Stampin' Up! Papillon Potpourri stamp set, which I hand coloured with Elegant Eggplant and So Saffron markers, then added a few dots of Dazzling Details and attached it with a Glue Dot.
I stamped the card with the - Stampin' Up! Mixed Bunch stamp set in Raspberry Ripple, and hand coloured around the centres in So Saffron. The smaller flowers are stamped in Elegant Eggplant ink. I stamped an extra flower in Raspberry Ripple, then punched it out using the Stampin' Up! Blossom Punch, and added some Elegant Eggplant lines with the dual tipped marker, curved the petals with my Bone Folder, and popped it up with a dimensional.
I hope you enjoy this card.
SUPPLIES:
Stampsets:- Stampin' Up! Greetings of the Season, Papillon Potpourri, Mixed Bunch
Punches: Elegant Butterfly. Blossom.
Ink: Elegant Eggplant, Raspberry Ripple, So Saffron.
Cardstock: Whisper White
Adhesive: Glue dot, Dimensional.
Dual-tip Marvellous Markers: Elegant Eggplant, So Saffron
Embellishments: Dazzling Details glitter adhesive.
Saturday, 8 September 2012
Betsy's Blossoms Fun and Fresh Card - Stampin' Up!

I love the Spring colours in this card: Midnight Muse, Lucky Limeade and Whisper White.
*I then layered a piece of Lucky Limeade 5.5cm x 14cm which I had first stamped all over with the large image from the set with Lucky Limeade ink.
*Next I stamped the branch onto a whisper white 9.5cm circle cut out using the large circle die.
*I stamped an extra wing and bird onto scrap Whisper White card and cut them out, then popped them up using dimensionals.
*I adhered all the layers together with Snail adhesive, trimming off the bottom of the circle with my paper snips.
*You can add any greeting you like to this card. I chose to make it a birthday card.
*The final touch of Bling was a small rhinestone for the bird's eye.
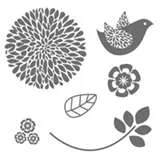
Betsy's Blossoms 6 piece - Stampin' Up! set - page 72 in the new - Stampin' Up! catalogue
Subscribe to:
Posts (Atom)