Click on the link and go to the Stampin' Up! - "promotions" page to find a huge list of items on the Clearance Rack.

See my recommendations & links for the best ART & CRAFT SUPPLIES
Tuesday, 18 December 2012
Friday, 14 December 2012
10 Different Christmas Cards Using TWO Punches! Stampin' Up!
Thursday, 13 December 2012

Monday, 3 December 2012


Thursday, 29 November 2012
One tag Twenty Different Ways - Stampin' Up! -

Here are 2 of the twenty tags. you can see them all on my
Aussie Stampers YouTube Channel: One Tag Twenty Different Ways.-Stampin' Up!
Friday, 23 November 2012
Christmas has arrived at our house!

Here is my Christmas display setup. It's beginning to look a lot like Christmas at our house!
I'm loving Stampin' Up's "Be of Good Cheer" DSP, and have planned my Christmas tree ornaments in the same colours of Cherry Cobbler, Very Vanilla and Gumball Green this year.
Now I just need to start on my tree......

Tuesday, 13 November 2012
Heartfelt Stampin' Event Sydney - Stampin' Up!
Thursday, 8 November 2012

Thursday, 1 November 2012
November Specials - Stampin' Up!


Monday, 29 October 2012
Watercolour Class YouTube - Stampin' Up! tutorial
Friday, 19 October 2012
Watercolour Classes - Stampin' Up!

I created this - Stampin' Up!Halloween Scene using sponging and masking. You can try it yourself.
It's easier than it looks!
Card Recipe:
Card stock: Whisper White for the card base - A4 cut in half and scored down the middle.
Stampin' Up! watercolour paper 10.5cm x 15cm
Aquabrush, Blender Pen
Inks: Black Stazon, Old Olive, Real Red, Midnight Muse,
Marvellous Markers: Daffodil Delight, Pumpkin Pie, Garden Green, Basic Black, Blush Blossom, Sahara Sand
White uniball signo gel pen
Stampsets: Greeting Card Kids, Lovely As A Tree (the largest pine tree image)
Adhesive: Sticky Strip (so the card front sits flat)
Punch: 1 3/4" Circle Punch
Post-it notes
Stampin' Sponges (quartered)
*Stamp the images first in black Stazon ink.
*Mask out a 1 3/4" circle with the post-it notes (punch out 2 pieces of post-it paper so the punch doesn't jam).
*Cut a piece of printer paper or post-it note to make the shape of the hill and mask it.
*Lightly sponge Real Red ink above the hill shape, then sponge Midnight Muse ink into the sky, and blend the 2 colours near the horizon.
*Remove the mask from the hill and sponge Old Olive over the entire hill.
*Colour the image of the girl and the pumpkin using an aqua brush and markers.
*Blend Black ink into the bottom of the picture.
*Allow the paper to dry (otherwise it will get muddy), then come in with the markers and highlight the shadows. (I had the light source coming in from the left). add some Daffodil Delight to the moon, and anchor the pumpkin with Sahara Sand shadowing.
*Add white gel pen to highlight the parts that are coming toward you.
*Draw 3 bats (start with a bird and add wing details).


Friday, 5 October 2012
Special Stampin' Up! Promotion

It’s not quite warm enough to hit the pool yet, but be sure to take advantage of the ‘spool’—Stampin’ Up!’s It's Spool Time! Promotion, that is During October, get a FREE spool of 3/8" (1 cm) Stitched Satin Ribbon with every $60 purchase—choose your favourite new In Color or earn all five!
Will you choose Summer Starfruit, Primrose Petals, Raspberry Ripple, Gumball Green or Midnight Muse? There are no limits, so you can get them all!
Email me with your order, and just let me know which colour you would like...choose one for every $60 you spend.

Fabulous You Youtube - Stampin' Up! tutorial- Stampin' Up! Australia
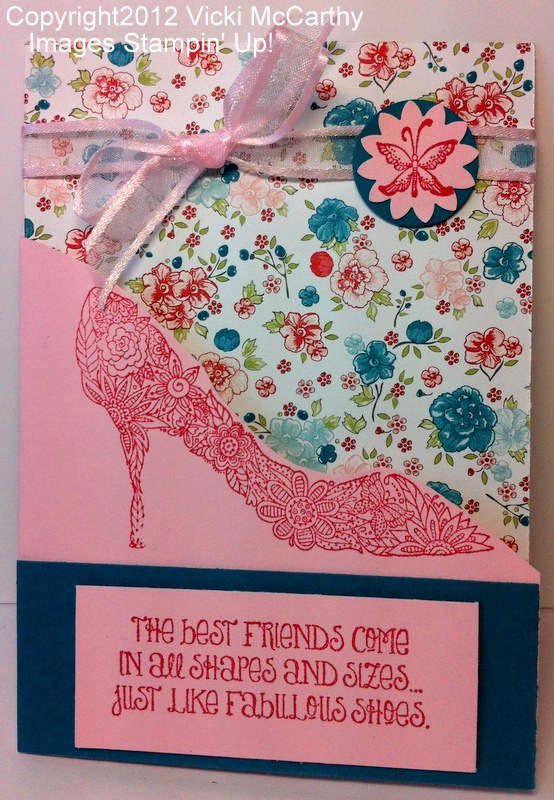
Card Stock: - Stampin' Up! Pink Pirouette, an A4 piece cut in half and folded down the middle, then
cut from the scrap piece a rectangle 3.3cm x 8cm and a small piece for the butterfly.
Island Indigo rectangle 4cm x 10.5cm plus a small piece for the circle.
Punches: Boho Blossoms and 1" Circle
Designer Series Paper: Twitterpated 10.5cm x 15cm
Adhesive: Snail and Dimensionals
Ribbon: Any soft pink organza ribbon or 3/8" Taffeta Ribbon in Pink Pirouette 122981
Stampset: Fabulous You- wood mount 126520, clear mount 126522
Classic Ink: Primrose Petals
Hope you enjoy this card!

Wednesday, 3 October 2012
Stamp-A-Stack of Christmas Cards- Stampin' Up! - Stampin' Up! Australia
Stamp-A-Stack Christmas Card Class this Sunday
@ The Art of Health and Wellbeing,
10A Norton Street, Leichhardt.
10.30am - 12.30pm
Make 10 cards with envelopes
$30 All materials supplied
For all the details and to register go to www.meetup.com/Sydney-Arts-And-Crafts-Group

Tuesday, 2 October 2012
Supplies list for Glitter Border Cards- Stampin' Up!

SUPPLIES:
*A4 - Stampin' Up! Cardstock: Pink Pirouette cut in half and folded.
*Ink: Primrose Petals
*Sponge Dauber
*Stamp Set: Two By Two
*Framelits- Labels Collection
*Rhinestones (small)
*Dimensionals
*Pink organza ribbon attached with a Glue Dot
*Sticky Strip
*Dazzling Diamonds Glitter

Use a light hand so you don't rub through the cardstock. I coloured the image with the light source coming from the right hand side, and shaded under the rim of the boat to give a 3D effect. I sponged around the edge of the image with Primrose Petals and added some Dazzling Details around the edge with a paintbrush.
Get FREE ribbon with every $60 order in October! - Stampin' Up!
Get your free - Stampin' Up! ribbon (in a choice of 5 colours)
with every order of $60 or more in October.
with every order of $60 or more in October.
Email your order to me to receive your free ribbon with your next order!
Offer available only for the month of October, 2012
Offer available only for the month of October, 2012
Friday, 28 September 2012
9 Halloween Projects...ONE Stamp Set!

Lucky Limeade and Tangerine Tango layering cardstock
Basic Black cardstock punched out using 2 3/8" Scallop punch, then cut in half.
Stamp the Mummy image onto the tag using Stazon Black ink
Layer the black pieces under a tag from the Ghoulish Googlies Bundle (page 27 of the Holiday Catalog)
Stick on a googly eye.
Add Dazzling Details Silver Sparkle to his eye socket
Adhere everything with Snail adhesive.

SUPPLIES: Ghoulish Googlies Bundle
Stamp the spider from the Googly Ghouls Stamp onto the round tag.
Use the 2 3/8" Scallop punch to punch out a piece of Tangerine Tango cardstock.
Adhere the tag with Snail adhesive.
Use the Spiderweb Embossing Folder to emboss the Glassine Bag with the Big Shot.
Pierce a small hole in the top of the bag and tie the tag to the bag with Pumpkin Pie Bakers Twine.

Cut the edge with the Finishing Touches Edgelit using the Big Shot.
Stamp the witch in Black Stazon ink.
Stamp the Mummies in Basic Grey ink.
Add a Googly eye to the mummies.
Paint their tummies with dazzling details adhesive glitter.
Stamp the word "Boooo" in black Stazon.

Cut the edge with the Finishing Touches Edgelit using the Big Shot.
Stamp the witch in Black Stazon ink.
Stamp the spiders at different heights on one side of the witch.
Using a ruler draw a line of straight dots for the webs using a basic black marvellous marker
Stamp the bats at an angle.
Cut a template into a cloud shape and sponge Basic Grey ink using a sponge Dauber (avoid the eyes)
Colour the witch using a certainly celery marker.
Using Snail, adhere a piece of certainly celery cardstock 14.5cm x 7cm under the top piece, making sure you line up the edges.
Stamp "happy birthday" from the "Best Dad Ever" stampset in stazon black ink

Tag from Ghoulish Googlies Bundle
Frankenstein Stamp, stamped in Stazon Black ink
Colour his face with Certainly Celery or Lucky Limeade marker
Use a bone folder to curve the label so it sits snug against the jar.
Adhere with Tombow Multi Adhesive.
Tie Striped Satin Ribbon (page 26 of the holiday catalogue) below the lid and leave 2 long ends.
Fill with cashews or lollies.


SUPPLIES: 6 x 7.9cm Square Envelopes (page 160 of the 2012 - 2013 Catalogue)
6 pieces Whisper White cardstock cut to 7.5cm x 15cm and folded in half
Stamp 2 of each witch, Mummy and Frankenstein onto the card fronts in Basic Grey Ink
Colour in the details using Tangerine Tango, Certainly Celery and Basic black Markers
Adhere Googly Eyes.
Make a basic box big enough to fit the envelopes and cards using Tangerine Tango card stock for the base and Howlstooth and Scaringbone Designer Series Paper for the lid ( page 24 of the Holiday Catalogue)
Make a belly band out of the 1/2" Striped Satin Ribbon (page 26 of the Holiday Catalogue) by tying it in a bow around the box.

Adhere Googly Eyes.
Stamp the bat for the lid and attach with a rhinestone brad, coloured black with a Sharpie pen.


Stamp the spider from the Googly Ghouls in Basic Black ink onto the Round Tag from the Ghoulish Googlies Bundle
Punch out two scallop circles in Tangerine Tango and Howlstooth and Scaringbone DSP using the 2 3/;8" Scallop Punch.
Use Snail adhesive to adhere to inside the base and on top of the lid.
Use sticky strip to attach Striped Satin Ribbon (page 26 of the Holiday Catalogue) to the sides of the container.
Fill with tic tacs or small lollies.

Basic Black cardstock for the layering piece, run through the Big Shot using the Spider Web Embossing Folder.
Attach a wide strip of Howlstooth and Scaringbone Designer Series Paper around the de-bossed Basic Black piece and adhere to the card base with Tombow Multi adhesive.
Stamp the witch onto Tangerine Tango Card and punch out with the 2 3/8" Scallop punch.
Colour her hat buckle with Dazzling Details glitter adhesive.
Use Crystal Effects on her buttons and boots.
Adhere a small Rhinestone Basic Jewel onto the spider and colour black with a Sharpie pen.
Draw white dots around the scallop with a Uniball Signo Gel Pen
Adhere to the strip of DSP with 2 Stampin' Dimensionals.
Sydney Card Making Classes - Stampin' Up!
Our next - Stampin' Up! classes are on Tuesday October 2nd in St Peters, Sydney.
Afternoon Class 12.30-2.30pm
Evening Class 7.30-9.30pm
To see all the details and to register go to www.meetup.com/Sydney-Arts-and-Crafts-Group

The Tuesday night class is "Halloween"
The Tuesday afternoon class is "Baby cards and hand coloured Teddy Bears"


Thursday, 27 September 2012
Peace Card - Stampin' Up!

As a meditation teacher, I often use peace as a theme with my students, and it's a sentiment that can be used all year round, not just at Christmas.
This card also features the - Stampin' Up!Elegant Butterfly Punch. It co-ordinates perfectly with the - Stampin' Up! Papillon Potpourri stamp set, which I hand coloured with Elegant Eggplant and So Saffron markers, then added a few dots of Dazzling Details and attached it with a Glue Dot.
I stamped the card with the - Stampin' Up! Mixed Bunch stamp set in Raspberry Ripple, and hand coloured around the centres in So Saffron. The smaller flowers are stamped in Elegant Eggplant ink. I stamped an extra flower in Raspberry Ripple, then punched it out using the Stampin' Up! Blossom Punch, and added some Elegant Eggplant lines with the dual tipped marker, curved the petals with my Bone Folder, and popped it up with a dimensional.
I hope you enjoy this card.
SUPPLIES:
Stampsets:- Stampin' Up! Greetings of the Season, Papillon Potpourri, Mixed Bunch
Punches: Elegant Butterfly. Blossom.
Ink: Elegant Eggplant, Raspberry Ripple, So Saffron.
Cardstock: Whisper White
Adhesive: Glue dot, Dimensional.
Dual-tip Marvellous Markers: Elegant Eggplant, So Saffron
Embellishments: Dazzling Details glitter adhesive.
Saturday, 8 September 2012
Betsy's Blossoms Fun and Fresh Card - Stampin' Up!

I love the Spring colours in this card: Midnight Muse, Lucky Limeade and Whisper White.
*I then layered a piece of Lucky Limeade 5.5cm x 14cm which I had first stamped all over with the large image from the set with Lucky Limeade ink.
*Next I stamped the branch onto a whisper white 9.5cm circle cut out using the large circle die.
*I stamped an extra wing and bird onto scrap Whisper White card and cut them out, then popped them up using dimensionals.
*I adhered all the layers together with Snail adhesive, trimming off the bottom of the circle with my paper snips.
*You can add any greeting you like to this card. I chose to make it a birthday card.
*The final touch of Bling was a small rhinestone for the bird's eye.
Betsy's Blossoms 6 piece - Stampin' Up! set - page 72 in the new - Stampin' Up! catalogue
Tuesday, 28 August 2012
Stamp Camp at the Hunter Valley Retreat- Stampin' Up! Australia
We had a fabulous weekend away in the Hunter Valley, doing nothing but stamping, eating, (the fully catered menu was absolutely outstanding), laughing, making new friends, scrapbooking, trying out new papercraft patterns, doing design challenges, making shoebox swaps, and enjoying each others' company. Many thanks to the lovely Marelle Taylor for her exceptional organizing skills in ensuring that we all had a wonderful time.
Can't wait till next year!


Thursday, 16 August 2012
Order your new - Stampin' Up! catalog today!
Order your new - Stampin' Up! catalogue today! It is absolutely gorgeous!
I am taking pre-orders for when the catalogue goes live on
September 1st.
To get your FREE - Stampin' Up! catalogue (plus $5.95 postage and handling)
just contact me at vicki.mccarthy@live. com.au
and I'll pop one in the post for you.
I am taking pre-orders for when the catalogue goes live on
September 1st.
To get your FREE - Stampin' Up! catalogue (plus $5.95 postage and handling)
just contact me at vicki.mccarthy@live. com.au
and I'll pop one in the post for you.
Tuesday, 14 August 2012
One Card SIX Different Ways Supplies List - Stampin' Up!

Here are the supplies and measurements for my Youtube - Stampin' Up! Tutorial, One Card SIX Different Ways.
Card Stock: - Stampin' Up! Whisper White, Real Red, Basic Black
Ink: Real Red
Stamp Sets: Delicate Doilies, Mixed Bunch
Embellishments: Scallop Dots Ribbon Basic Black
Basic Jewels Pearl, Rhinestone
Liquid Pearls, White
Scotch Tape
Snail Adhesive
Tombow Multi purpose glue
Dazzling Diamonds Glitter
Button from the Brights Designer Buttons (small Red flower button)
Glue Dots (to adhere the pearl to the button)
Measurements:
Card base Whisper White 16cm x 10.5cm, scored and folded in half
Real Red layer 10cm x 7.5cm
Scraps of Basic Black and Whisper White for punching out the blossom shape (stamp the white card scrap with real red then punch out the image).
Friday, 10 August 2012
FREE template giveaway. Choc-chip Cherry Cupcake that looks good enough to eat! - Stampin' Up!


Isn't this just too yummy for words!
I had such fun designing this card. The full - Stampin' Up! supplies list is printed below the template. Right-click on the template image, choose 'save image as', then print, making sure your printer is set to 100%. You can slip a gift card or greeting in the pocket.
It's a larger than life size cupcake, fits a regular C6 envelope and looks good enough to eat! Enjoy!

Choc-chip Cherry Cupcake Supplies List
- Card base: - Stampin' Up! Pretty in Pink Card stock
- For the patty case and cherry stem: Chocolate Chip Card stock cut at 4 1/2" x 2 1/2" ( 11.5cm x 6.5cm) plus small piece for the stem.
- Simply Scored Tool to fan fold the chocolate chip card stock at every 1/4"
- For the cherry: Real red Card stock
- Embossing folder (emboss only the front of the top) Elegant Lines
- Big Shot
- Basic Pearls for the silver cachous on top
- Crystal Effects for the cherry. Adhere the stem when the crystal effects has dried a little, then add a 2nd coat for really high gloss and dimension
- Adhesive: Sticky Strip (attach the patty case to the sides at the back)
- Glue Dots for inside the bottom of the patty case and for the cherry
- TIP: When adhering the patty case, gently curve it to match the template base, adhere with Sticky Strip, then trim a gentle curve with your paper snips.
Thursday, 9 August 2012
Pretty Bouquet Card Supplies List - Stampin' Up!- Stampin' Up! Australia
Here is the Supply List:
Cardstock:Whisper white, Real Red, Basic Black
Snail Adhesive,
2 way glue pen,
Punch: Owl Builder,
Glitter: Dazzling Diamonds
Stampin' Write Marker- basic Black,
Stampsets:
Loving Thoughts, Language of Friendship
Inkpad: Real Red
Scotch Tape

Friday, 3 August 2012
The Retiring List Has Been Announced! - Stampin' Up!- Stampin' Up! Australia
Stampin' Up! Retired List Promotion
Hundreds of - Stampin' Up! stamp sets and accessories are retiring, and this is your last chance to get them before they're gone. All retiring products are only available while supplies last, so don’t miss your chance—contact me today to place your order!

Hundreds of - Stampin' Up! stamp sets and accessories are retiring, and this is your last chance to get them before they're gone. All retiring products are only available while supplies last, so don’t miss your chance—contact me today to place your order!
Wednesday, 1 August 2012
Birthday Cards - Stampin' Up! Australia

- This card is for a teenager's 18th birthday. I wanted a nice masculine card, so I used the - Stampin' Up! pennant punch to make a banner.
- I cut the scallop edge using the scallop framelit.
- Next I scored the front of the card every 1/2 inch using the Simply Scored Tool to give an embossed effect. This is a really versatile way to jazz up any card front and you can score on the diagonal as well if you have the diagonal plate.
- Each flag has a circle cut from the owl builder punch ( middle sized circle)
- The stamp is from the the Pennant Parade stamp set, and I finished the card off with some linen thread, and glued on some separate tiny bows.


This next card was for a teenage girl who loves the clean and simple look. I kept the card fresh by using only two colours, Whisper White and Pear Pizzaz.
- I started by punching out the flower with the blossom punch near the bottom right hand corner of the card.
- Next I ran the card front through the Big Shot using the polka dot embossing folder.
- I layered a piece of Twitterpated Designer Paper inside the card and attached the punched out blossom in the top right hand corner making sure it didn't show through onto the front when the card was closed. This allows a space for journalling.
- Next I cut a strip of pear pizzaz card stock for the front and punched out the flower centre using the boho blossoms punch.
- I stamped the greeting from the Apothecary Art Stamp Set
- I pierced holes using the paper piercing tool and inserted white brads into both these pieces of card stock then affixed the greeting to the front and the centre to the flower (which I lined up with the card closed) using Dimensionals.
I hope you like the cards!
If you would like to come to a class in St Peters, Sydney just email me, or I can come to your home (minimum of 4 guests) and give a private class.
Thanks for visiting, and have a great day.
Subscribe to:
Posts (Atom)