Showing posts with label Australian StampinUp demonstrator. Show all posts

Monday 1 January 2018

How to Make an Art Journal Using Watercolour Paper. Mixed Media Art. Australian Stampin'Up! Demonstrator.

Buy Crafting Supplies in Australia at http://www.Aussiestampers.stampinup.net


Take one pack of Stampin' Up! Watercolour Paper and turn it into a 20 page art journal!
This is my very first attempt at book-binding, and I am pretty pleased with how it turned out, although I still have a lot to learn LOL.
I used a sheet of A4 card stock cut in half to cover the journal, bakers twine and a sewing needle to bind it.
I show you how to make the cover in part 2 of the video.
Have a marvellously creative day!
Vicki x

Saturday 15 July 2017

Garden Girl with Prismacolor Pencils

Hello and welcome to today's blog post and papercraft project. I wanted to try some simple colouring using Prismacolor Pencils. These pencils have a gorgeous silky feel and are my pencils of choice for really smooth blending. 
I kept it simple, and made sure to ground the image with some sketchy green so it doesn't appear to be floating on the page.
I used tuxedo memento black ink for all the stamping, and made sure to include a greeting inside the card as well as the sweet butterfly image.
I love doing a single layer card once in a while, and keeping it simple.
Thanks for stopping by, and I hope you enjoyed today's project. Vicki x


Garden Girl Stamp set 
wood mount 143949 
clear mount 143952 

Lovely Inside and Out Stamp set
wood mount 144008
clear mount 144011


Tuesday 13 June 2017

Carry Over Favourites Card Recipe For You. Stampin' Up! Australian Demonstrator.

Card Recipe using Stylish Stems Framelits. 


Stamps
• Special Reason Stamp Set

Paper
• Daffodil Delight Cardstock
• Pool Party Cardstock 
• Sahara Sand Cardstock 
• Shimmery White Cardstock 
• Whisper White Cardstock 

Ink
• Daffodil Delight Classic Stampin' Pad
• Night of Navy Classic Stampin’ Pad
• Sahara Sand Classic Stampin’ Pad

Accessories and Tools
• White Baker’s Twine
• Floral Boutique Designer Washi Tape
• Stampin’ Dimensionals
• Aqua Painters
• Big Shot
• Stylish Stems Framelits Dies

Thanks for stopping by my blog today!

BUY NOW

 Thanks so much for shopping with me!  Vicki  x 💝

Wednesday 31 May 2017

Sneak Peek: Soft Sayings Card Kit.


Don't you just love a sneak peek! Here is one of my favourite things in the new catalogue, which is only a few days away!


It's a brand new all-inclusive Card Kit called Soft Sayings. 

In the kit are 20 Cards, 2 of each design, in 3 different sizes, with matching envelopes. Everything comes in a neat presentation box so you can take it on the run and work on your cards at your own pace. Everything you need will fit inside the box. The stamps, ink spot and acrylic block are provided, all you need to supply is adhesive.

Here is a video showing you what's inside. The all-inclusive kit will be available in my online store from June 1st.

Item # 145466 $61.00


Thanks for shopping with me!
Have a wonderful day.

Vicki x 💝

Monday 29 May 2017

Artisan Watercolour Technique

Hello, and thanks for visiting today. I promised I would show you some of the water colouring techniques I have been studying at the Regional Gallery.

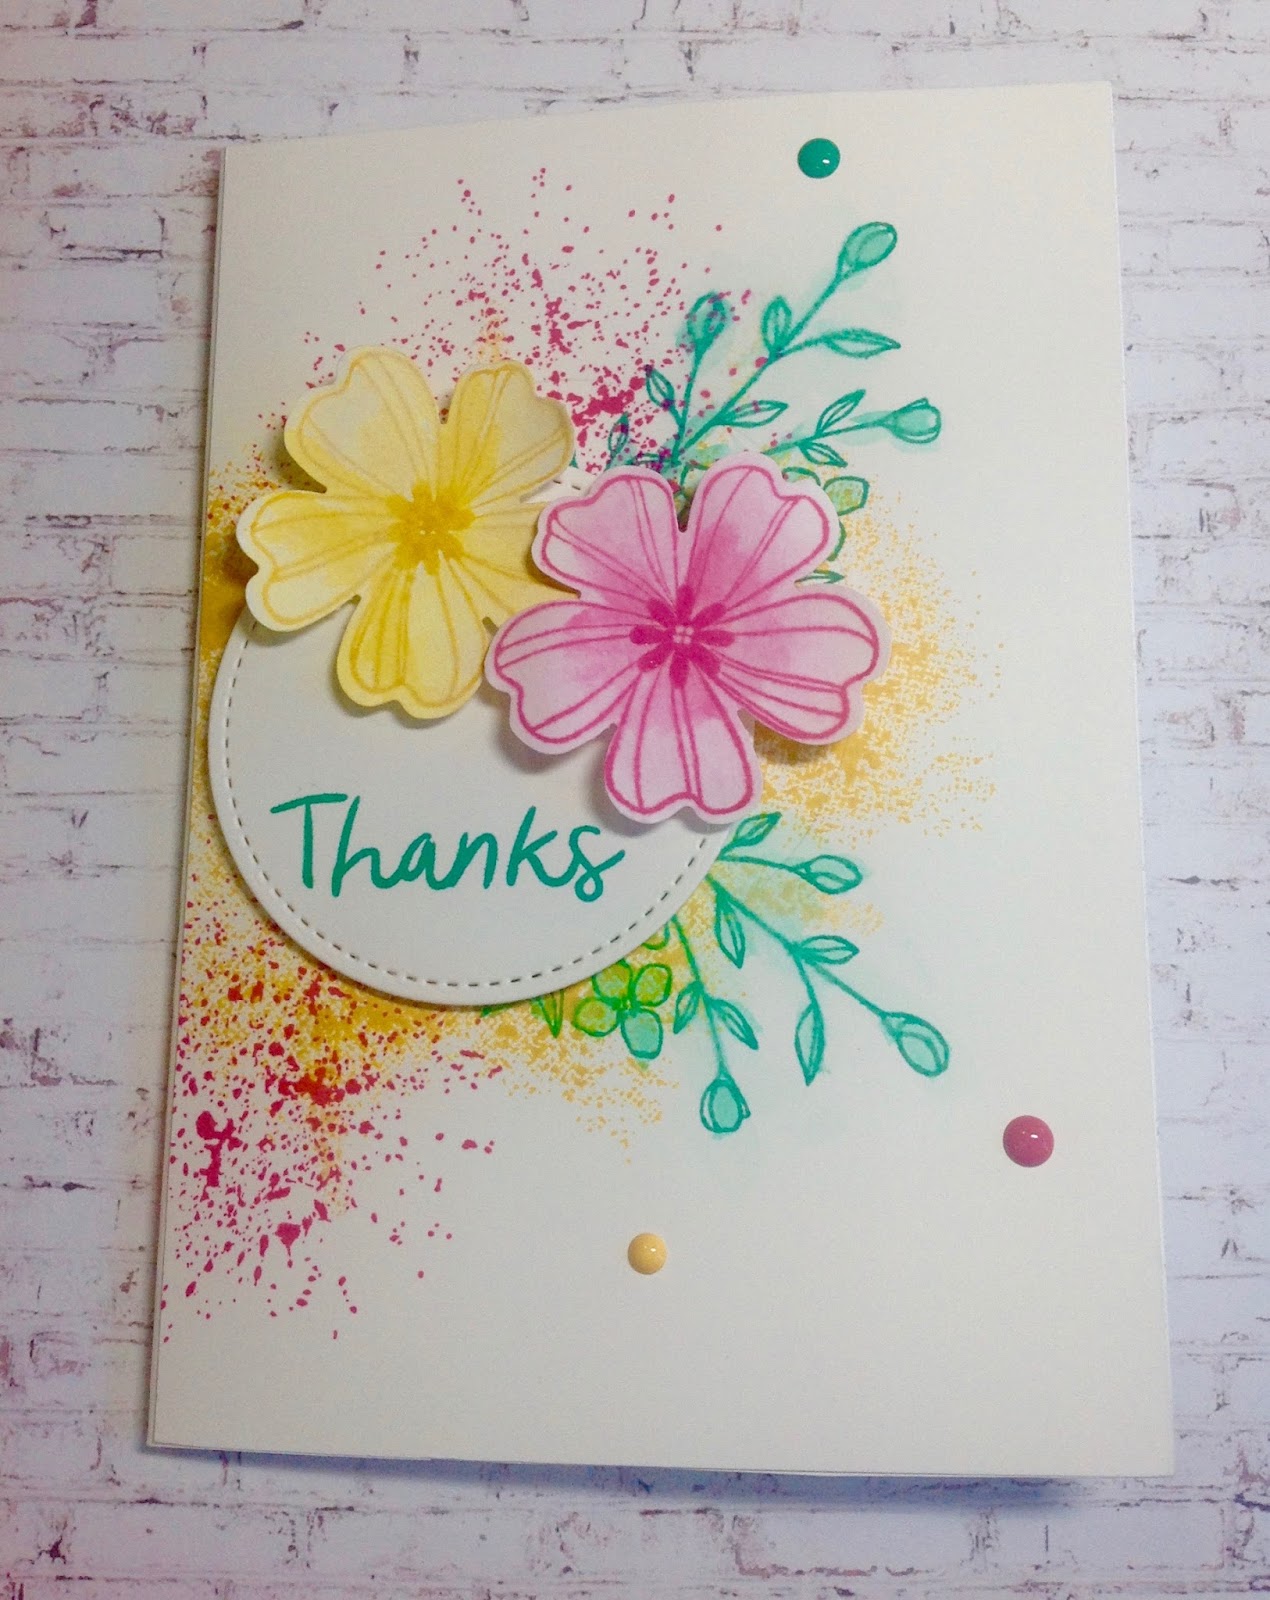
This gorgeous stamp set Touches of Texture is just so easy to work with.
I used Arches Aquarelle paper for this technique, as it has a real tooth and soaks up the colours so thirstily. I generally use the Stampin' Up watercolour paper, but this technique works best with a really heavy paper.
I have a selection of different papers I use, and the results differ greatly, depending on the result you want to achieve.

To achieve this look I stamped in Memento tuxedo black ink, then took my thick brush and did a water wash over the area outside the stamped image in the places where I wanted a background effect.
I then applied the background colours by drawing a line with my Stampin' Write markers, without touching the stamped image, but staying close to the flower. 
I used a number 4 round brush for this, and came in with a number 2 round brush in the finer areas, dragging the colour out towards the edges of the background. 
When I had achieved the desired result I heat set the ink.

To colour the flowers I used the number 2 round brush dipped in water, then picked up colour from the lid of the ink pad. The stripes were made by simply leaving some areas bare. 

   I did the same technique with the centres and the leaves, and used a white Jellyroll marker to make a stippled ring around the middle of the petals, which gives a real 3D effect, as though the petals are curving outwards.


You can see in this close-up how I kept the background colours outside the stamped image.

The colours I used were Crushed Curry, Tempting Turquoise, Garden Green and Melon Mambo.
I stamped the words I Love You. You Are Fabulous, using the Thoughtful Banners Stamp Set onto Melon Mambo Cardstock.

Here you can see the stippled white ring I made with the white Jellyroll pen. 

I was absolutely thrilled with the result, and am looking forward to using this technique with all my large floral stamps.
I mounted the card onto Tempting Turquoise Cardstock, and used the same watercolour paper for the inside layer of the card.
Mission Accomplished!

I hope you enjoyed this tutorial.

Touches of Texture   Wood Mount 141934   Clear Mount 140517

 Thanks so much for shopping with me!  Vicki  x 💝


Wednesday 24 May 2017

Best Birds Simply Rendered. Stampin' Up! Demonstrator Sydney.


Hello, and thanks for visiting by blog today.
These two cards received a lot of comment at my stamp class, so I decided to post them for you to show how simply rendered cards are often the best. The rule of threes applies here....3 colours for the card: Whisper White, Daffodil Delight and Basic Black. The birds are cut out using the Birds and Blooms thinlits and the netting and sentiments are from the Best Birds Stamp Set. 
3 small rhinestones  were coloured using Copic Markers (or you could use a black Sharpie) and the cards were trimmed with black washi tape.
Simple and fast!
I have made a video for you to see how simple these cards are to make.


My Youtube Tutorial


Birds and Blooms Thinlits  141477
Best Birds Stamp Set  141525


Have a wonderfully creative day.
 Thanks so much for shopping with me!  Vicki  x 💝

Tuesday 23 May 2017

Soft Watercolours Technique


Hello, and thanks for visiting my blog.

Today I have a card for you that is softly watercolored using an easy technique with your Stampin' Write markers and the Best Birds stamp set.

Using the branch stamp, colour directly onto your stamp using old olive for the leaves and soft suede for the branch.
Spritz some water (not too much) onto the stamp and stamp your image onto a piece of whisper white card stock. Have a paper towel handy to blot any excess, and then heat set with your heat tool.

Use the same technique for the bird image, using mint macaron marker for the wings, soft suede for the body, and so saffron for the beak and feet.

When your paper is completely dry, finish the card by adding some copper dots washi tape to a mint macaron card base, just under your art piece, then use glue dots to adhere some fine copper thread above the bird and to the right.

Use copper embossing powder for your greeting, then cut out using the tags framelits,  and add 3 white sequins to complete your card.

                                             Best Birds Stamp Set #141525 Photopolymer
                                                                BUY NOW

Have a wonderful day.  Thanks so much for shopping with me!  Vicki  x 💝

Thursday 18 May 2017

Sneak Peek: Color Theory Suite.

Hello, and thanks for visiting my blog.
Today I have a SNEAK PEEK for you! This coordinating set is a suite for all seasons.
From June 1st, you will be able to order a whole swag of new stamps, embellishments and crafting goodness! Aren't these cards so pretty?
Watch the video and put these on your wish list. You will be able to purchase these from me from June 1st, and I will have the new catalogue download on my blog for you to browse through. I am also planning a new catalogue Walk Through on my Aussie Stampers Youtube Channel to highlight my favourite things. 


Watch the Video


                                     Thanks so much for shopping with me!  Vicki  x 💝

Saturday 13 May 2017

Best Birds Class: Make 6 Cards. Stampin' Up! Australian Demonstrator.

Hello, and thanks for stopping by my blog.

There is something about the combination of navy and white that is easy on the eye, and yet makes a statement all at the same time.

 For this class I used the Best Birds Stampset #141525 and matching thinlits Birds And Blooms #141477 in as many different ways as I could imagine,  using Night of Navy and Whisper White as the colour scheme. 
The gorgeous Designer Series Paper Floral Boutique #141663 is the perfect accompaniment to this symphony of blue!

                                    Here are the finished 6 cards in The Best Birds class.

                               The White Organza Ribbon #114319 makes a pretty accessory 
teamed with 3 White Perfect Accents #138416

                        Here you can see the rhinestones I coloured with a navy Copic marker.

                       A stitched oval Thinlit is strategically placed inside to write the message on.


                             The tiny die cut bird needed a reverse image to complement him.
                                      The inside of the card reads "on your wedding day."

                       This card uses the open die cut shape, and the bird was saved for later.

Heart die cut with both birds "kissing" for an anniversary card.


Thanks for visiting. I hope to see you in a class soon!
Vicki x 💝

Wednesday 10 May 2017

My June Card Making Class. Register Here.

In June I am focusing on the Happy Celebrations Stamp Set and Embossing folders.
These folders give a lovely Letterpress effect, and I showed an example of this type of card in my Mothers Day Card post.
In the June class we will be making 6 different cards.
  Here is a video preview of my next class in June. 
You can register for this class and any upcoming classes at 
      www.meetup.com/cardmaking-art-papercraft

 Thanks so much for shopping with me!  Vicki  x 💝

Baby Onesie with vellum and distressing


Hello, and welcome to my blog. Here is a project for you that uses vellum as an underlay.

When you slightly offset the layers, you can achieve a look that is right on-trend.

The colour scheme is bermuda bay, mint macaron and so saffron.

The baby onesie has been cut out using the matching framelits, and is adhered using washi tape and the sentiment, so that the sleeves are partly lifting from the page. This is a very subtle kind of layering, especially with the white-on-white colour scheme.

Finish off your card by slightly curling the edges of the layers, then distressing the edge of the card with your fingernail before adhering everything together using Tombow multi adhesive.

Add a bakers twine bow and some small pearls ( 3 is the magic number for these! )  and your card is now complete.

I hope you enjoyed this project.
Vicki x  💝

Sunday 7 May 2017

Carry-over Pansy Punch: Give it some Pizzazz!

I really love using punches as a quick pop-up on a card, and wanted to do something extra special with the Pansy Punch, as it is carrying over into the new catalogue. I stamped using the Flower Shop stamp set onto whisper white, once in crushed curry, and once in melon mambo. Using my blender pen I darkened the inner half of the petals, then punched them out with the pansy punch.
I stamped the "thanks" greeting from Thankful Thoughts using emerald envy towards the bottom of a smaller piece of card stock and cut it out using the stitched framelits.

I arranged this on a plain whisper white card base to decide where I wanted to stamp the images from Touches of Texture.
Once I had my layout planned I stamped the bouquet image twice using emerald envy, then the larger splashes in melon mambo, and the finer splashes in crushed curry. I coloured the bouquet image with my blender pen, but going a little outside the lines to give a soft watercolour look.  


Everything was popped up on dimensionals and I stacked 2 dimensionals together for the pink pansy, after curving the petals with my bone folder. Coordinating bling in each of the 3 colours completed my card. I love how it turned out. It is cheerful and pretty, and gives the pansy punch a whole new lease of life. I also decorated the inside of the card with the emerald envy bouquet branch.


Thanks for stopping by my blog. Enjoy the rest of your weekend.
 Thanks so much for shopping with me!  Vicki  x 💝

Friday 5 May 2017

Copic Puppy and Kitten : Pretty Kitty meets Bella And Friends!


Hello, and thanks for visiting my blog today!

 Aren't these little guys too cute! Our dog Koby is a Maltese Poodle Cross and I just had to have the Bella and Friends stamp set, as well as the Pretty Kitty set.

I decided these two needed to be best friends, so I tied a balloon to each of their tails and coloured them with my Copic Markers, after stamping in Memento Tuxedo Black Ink.

I also gave them both rosy cheeks, and made the puppy a boy and the kitty a girl, with their blue and pink collars!
I added some shine to the balloons with a white Gellyroll marker. 

I have an ever-expanding selection of markers and pencils, as well as my Copics (I am an Intermediate Copic Designer), and love watercoloring as well. Over the last two years I have been studying watercolour painting at the Regional Gallery at Hazelhurst and I will be showcasing some of my work here on the blog from time to time.

To finish the card I matted the sentiment onto a crumb cake base using the Stitched Framelits, then adhered everything to a Basic Black Card base.
Of course I love to finish my cards on the inside as well, so I chose the seated version of the kitty and the puppy and simply stamped them on either side of the inside layer in black, and left them uncoloured. I wanted the outside to steal the show.

What do you think? Pretty cute, right?
Here are the supplies you will need, plus whatever you choose to colour your card with.

 Pretty Kitty Wood Mount #141861   Clear Mount #141864
Bella And Friends Wood Mount #141867  Clear Mount #141870

Stitched Shapes #145372
Memento Tuxedo Black Ink #132708


Have an awesome day. Thanks for shopping with me.
Vicki x  💝


Wednesday 3 May 2017

Home Decor Dream Catcher


                           Sometimes an idea brews away until you just HAVE to go with it.
        The first time I saw the Feather  Together Stamp set, I knew I would make a dream catcher.

I had been hoarding the beautiful background paper from Serene Scenery with the beach scene, and always had a home decor piece in mind. Rather than buy a glassed frame, I wanted something more beachy to go with our home decor (we live on the river that runs out to sea at Cronulla Beach and I have a love of seashells and all things nautical).


I picked up a set of 4 primed canvases from Kmart for $5.  The canvas measures 7 3/4" square by 1/2" deep, and I cut the Designer Series Paper to 6" square. I adhered it to the canvas with Tombow Multi adhesive, then flipped it over and pressed firmly from the back to ensure a good grip.


                                Now I could go about the dream catcher construction process!

The Lace Doilies from the Falling In Love suite were the perfect size and I loved the detailed design. I started with some thick twine and wound it through the outside of the doily, then tied it in a knot from the back.
Next I tied some doubled Linen Thread to 3 places on the doily that would provide room for 3 of the feathers to hang from.
I stamped  the feathers on Very Vanilla using Bermuda Bay and Island Indigo ink, then fussy cut them, adding some extra cuts to the sides to mimic a feather shape.
I also flossed the edges of the Linen thread where I had tied the linen thread to the feathers.


                          This photo shows the cuts I made down the sides of the feathers.
I coloured some pearls with my Copic Markers (you could use sharpies for this if you don't have Copics). They look like beads threaded through a woven dream catcher! How cool is that!
I used Foam Adhesive Strips to mount everything...that stuff is super convenient for round shapes like this, and it all came together really quickly.

My Dream Catcher now has pride of place on our fireplace mantel in the Living Room, and I am one happy stamper!


Supplies used:
Serene Scenery DSP #141642
Feather Together Stamp Set #141597
Foam Adhesive Strips #141825
Linen Thread #104199
Pearl Basic Jewels #119246
Lace Doilies #142793
Tombow Multipurpose Liquid Glue #110755
Bermuda Bay and Island Indigo Inkpads
Very Vanilla Cardstock
Canvas and thick twine from Kmart

 Thanks so much for shopping with me!  Vicki  x 💝


Tuesday 2 May 2017

Using a vellum overlay and how to adhere it to your card.


Hello, and welcome to today's project. Flu season has arrived, and I was down for the count with coughing and sneezing all last week. Luckily for me, Paul took over some of the grocery shopping while I was ill, and kept me well-provided for with lovely cups of tea and sympathy. Gotta love that man!

I love stamping on vellum, and this card using the Get Well Soup stamp uses a couple of neat techniques I wanted to share with you.

Firstly, the background is Designer Series Paper, adhered to a whisper white card base.
 The image is stamped in versamark ink, then white embossing powder is sprinkled over the top (remember to swipe the vellum with your embossing buddy first) and heat set using the heat tool. When doing this make sure to heat the back of the paper quickly as well so it doesn't curl up!
Colour the soup with a so saffron marker, then adhere the vellum with a strip of washi tape.
Adhere a thick bakers twine bow with a glue dot or liquid tomboy multi adhesive.

Another way to  adhere a vellum overlay would be with some glue dots, and then cover the dots with rhinestones, pearls or enamel embellishments.

I hope you found this helpful.
Have a wonderful day,
Vicki x  💝


Sunday 30 April 2017

Fruity Gift Bag


Hello my friends, I absolutely love cafe bags....I have used these for giving away goodies in my classes, and they have a nice long, flat front profile so you can really go crazy with a big tag.
Make sure to stock your bag with goodness, then fold over the top and wrap it around, so that it is tightly sealed. Loop some ribbon, then use dimensionals or Tombow to adhere your tag.

This tag is made using the gorgeous Fruit Stand stamp set.

 Thanks so much for shopping with me!  Vicki  x 💝


Saturday 29 April 2017

From my Garden to Yours

I am a keen gardener and have lots of favourite spots in my garden. It's so peaceful having a place to sit and reflect after a busy day. These are some of my favourite places in our garden.


I also love to give away cuttings to my friends and neighbours, and like to add a card as a thank you for the happiness friends bring into my life. We live in such a close-knit community here, and I love our street! We spend much time socialising, and there is always someone to chat with when I am out walking Koby, our dog.


From the Garden stamp set


Have a wonderfully creative day!
 Thanks so much for shopping with me!  Vicki  x 💝