Showing posts with label Youtube tutorial. Show all posts
Showing posts with label Youtube tutorial. Show all posts
Friday 27 June 2014
Notched Edge Gift Box. Stampin' Up! Australia.
You can watch the video tutorial here: http://youtu.be/qv8pgN8bXgU
This is the last in the series on the current catalogue....jump on over to my online store for the last of the clearance rack items....get 'em before they're gone for good!
Vicki xx
Wednesday 25 June 2014
Incredible All-In-One Trifold Card made from ONE piece of Card Stock. Stampin' Up! Australia.
How adorable is this card! I was playing with an idea for a tri-fold card that didn't require any hinges to make it work, and I came up with this design using the Window Frames Collection Framelit Dies. You just need ONE piece of card stock to make the card base. How cool is that! ....very pleased with self obviously.....There is a video tutorial for this card on my Youtube channel:
http://youtu.be/T8c7Cy1-XsU
You could use any stamps and papers you like to create this card. I have chosen some sneak peek items from the new catalogue, which is due to be released very soon (only 6 more sleeps!). I know you will enjoy the gorgeous new stamp sets and papers. I am having fun playing with all the new goodies!
Vicki xx
Wednesday 26 March 2014
Stampin' Up! Australia. Blog Candy Prize Give-Away! Easter Critters!
Stampin' Up! Australia
How would you like to be in the draw to win these cute critter Easter Boxes!
All you need to do is to leave a comment under this blog post and I will choose a winner and post the kits to you. The kit contains everything you will need to complete your 2 boxes, you will just need to supply your own adhesive. Full instructions for assembling the boxes are on my Aussie Stampers Youtube Channel.I cased the bunny from Kimberley Morris at Procrastistamper, and the chick from Tammy Beaver at Dream, Create, and Share.
Punches used for the chick were
1" circle (eyes and eyelids)
cupcake builder (eye twinkle)
pansy (tuft of feathers on head)
3/4" circle (eyes)
modern label (feet)
1 3/4" scallop (wings)
full heart (beak) or you can use the hearts framelits 2nd smallest
boho blossoms (tail)
top note die and big shot
Punches used for the bunny were
1" circle (eyes)
3/4" circle (eyes)
cupcake builder (eye twinkle)
small heart trimmed with 1/2" circle (nose)
extra large oval (ears and feet)
large oval (inside ears)
1/2" circle (pads on feet)
1 3/4" scallop trimmed with extra large oval (paws)
top note die and big shot
Good luck!
Wednesday 22 May 2013
Heal Your Life® Art Workshop coming soon.
The Heal Your Life® Art Workshop: Create a 16 page journal of positive affirmations,full of whimsical characters and uplifting thoughts.
Over a 4 week course, watch full HD video tutorials and follow step-by-step in the creation of your own unique journal. Learn how to create your own customised affirmations for all areas of your life.
Register at www.DrawMyDoll.weebly.com
Saturday 27 April 2013
My Li'l Mummy Paper Doll - shop Stampin' Up! Australia online
Thursday 11 April 2013
Whacky Card - Zetti Inspired - Australian Stampin up demonstrator
This card represents a departure from my usual style. I was inspired by the work of Teesha Moore, and the Zentangle artform. It was a lot of fun to create:)
Thursday 4 April 2013
Album In A Day - Flower Fair Bundle Class Preview- Stampin' Up!
To purchase this class go to the top right and click on "Add to Cart"
Tuesday 5 March 2013
Coming Soon!- Stampin' Up! Australia
Wednesday 20 February 2013
Yummy Cupcake Card - Stampin' Up!- Stampin' Up! Australia
This card uses lots of co-ordinating products : the Cupcake builder punch, patio party DSP, and the matching cupcake stampset, as well as the typeset alphabet die. It's simple to put together, and makes an eye-catching birthday card. Enjoy the video tutorial!
Friday 25 January 2013
Sneak Peek from the new Seasonal Catalogue.- Stampin' Up! Australia
Here is a card I made using the Sale-A-Bration stampset "Vintage Verses." The scalloped heart (just in time for Valentines 'Day) is from the new Hearts A Flutter Framelits.
Did you know that if you join Stampin' Up! during Sale-A-Bration, you will receive 25% more free product in your starter kit? If you are thinking of joining as a demonstrator, just contact me on 0414 393 035 and I will answer any questions you may have.
Did you know that if you join Stampin' Up! during Sale-A-Bration, you will receive 25% more free product in your starter kit? If you are thinking of joining as a demonstrator, just contact me on 0414 393 035 and I will answer any questions you may have.
Monday 14 January 2013
Sneak Peek from the new Stampin' Up! catalogue! Swallowtails.
Enjoy!
Vicki x
Thursday 10 January 2013
Stampin' Up! - Fabulous Neverending or Endless Card
You can use these instructions for your basic template and then choose your own papers, stamps and embellishments for any occasion.
The pieces for your basic card are 4 pieces measuring 6" x 3", and scored along the 6" side at
1 1/2" and 4 1/2" You will need Sticky Strip to adhere the pieces together, and a Bone Folder to make the creases.
Stampin' Up! - Have fun with it!
Vicki x
Monday 7 January 2013
9 Stepped Up Cards - Stampin' Up!
Friday 14 December 2012
10 Different Christmas Cards Using TWO Punches! Stampin' Up!
Thursday 8 November 2012
One Tag TWENTY Different Ways! - Stampin' Up! -
Enjoy!
Monday 29 October 2012
Watercolour Class YouTube - Stampin' Up! tutorial
Friday 5 October 2012
Fabulous You Youtube - Stampin' Up! tutorial- Stampin' Up! Australia
Card Stock: - Stampin' Up! Pink Pirouette, an A4 piece cut in half and folded down the middle, then
cut from the scrap piece a rectangle 3.3cm x 8cm and a small piece for the butterfly.
Island Indigo rectangle 4cm x 10.5cm plus a small piece for the circle.
Punches: Boho Blossoms and 1" Circle
Designer Series Paper: Twitterpated 10.5cm x 15cm
Adhesive: Snail and Dimensionals
Ribbon: Any soft pink organza ribbon or 3/8" Taffeta Ribbon in Pink Pirouette 122981
Stampset: Fabulous You- wood mount 126520, clear mount 126522
Classic Ink: Primrose Petals
Hope you enjoy this card!
Tuesday 2 October 2012
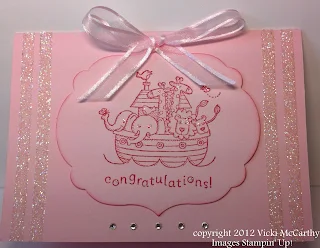
Supplies list for Glitter Border Cards- Stampin' Up!
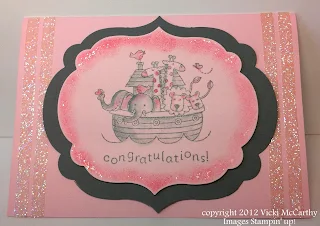
How to create perfect glitter borders...this is so easy! Simply place 2 rows of sticky strip down each side of the card, and spoon over Dazzling Diamonds glitter. Brush off the excess with your fingers or a paintbrush and voila! perfect results in record time! I have made 2 versions of this card:
SUPPLIES:
*A4 - Stampin' Up! Cardstock: Pink Pirouette cut in half and folded.
*Ink: Primrose Petals
*Sponge Dauber
*Stamp Set: Two By Two
*Framelits- Labels Collection
*Rhinestones (small)
*Dimensionals
*Pink organza ribbon attached with a Glue Dot
*Sticky Strip
*Dazzling Diamonds Glitter
For the second version I stamped the image in Basic Grey Ink and mounted it onto Basic Grey card, using the 2nd largest framelit. I hand coloured the image with Basic Grey and Pretty in Pink markers and a Blender Pen.
Use a light hand so you don't rub through the cardstock. I coloured the image with the light source coming from the right hand side, and shaded under the rim of the boat to give a 3D effect. I sponged around the edge of the image with Primrose Petals and added some Dazzling Details around the edge with a paintbrush.
Subscribe to:
Posts (Atom)


