Monday, 29 May 2017

Sponging Irresistibly Floral Specialty Paper Part 2.


Hello, and thanks so much for visiting my blog today!

Sometimes a card comes together that feels just right, and when I saw how much the sponged background looked like a trellis, I knew some simple Whisper White framelits were all that was needed to bring it to life.

 I combined the Pretty Pines Framelits with Paisleys and Posies, and voila! ... all that I needed was a greeting, so I made a custom greeting from the Thoughtful Banners Stamp set. With a total of 54 stamps, this set has just about any greeting you can think of, and it was fun putting together a phrase that suited the card.

Thoughtful Banners Photopolymer 141614


The colours I used were Daffodil Delight, Tempting turquoise and Rich Razzleberry, and I mounted everything onto a Rich Razzleberry card base. The sentiment was heat embossed in white on Rich Razzleberry.


           Bundle and Save 10% Thoughtful Banners Stamp set plus Duet Banner Punch 142330
                                                                     BUY NOW

The stamp set comes as a bundle with a handy dandy punch (gotta love that!), which makes stamping a breeze. For my card I cut a simple banner from Rich Razzleberry and adhered it to the very edge of the card.


I enjoyed whipping up this project, and I can't get enough of this gorgeous Designer Series Paper , Irresistably Floral 141644 ,which is retiring soon.

Thanks for stopping by today, and I will have more projects tomorrow. Have a wonderful weekend.

                                       Thanks so much for shopping with me!  Vicki  x 💝

Sunday, 28 May 2017

Canvas Art with Felt and Birthday Blooms. Australian Stampin' Up! Demonstrator


Hello, and thanks for stopping by my blog today.
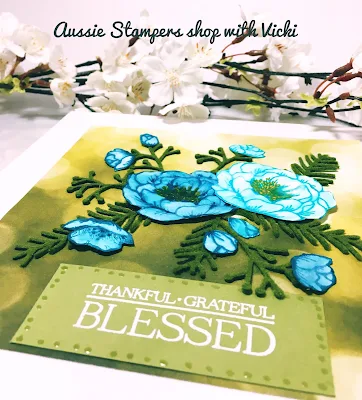
I love working on canvases. The work we do as card makers and paper crafters is often more art than card, and in this case I wanted to try something that I could use as a home decor piece. 


The stamp set Birthday Blooms is one of my absolute favourite sets for colouring. I used Shimmery White card stock, and stamped half of the blooms in Tempting Turquoise ink, and the other half in Dapper Denim ink.

I coloured inside the petals using a number 2 round brush and used the squeezed-together ink pads as my palette, drawing some of the colour from the stamped lines to soften the edges.

After the flowers had dried, I added some Crushed Curry with my marker to the centre of the two large blooms.

I cut out all the blossoms, and used some olive green felt to cut out the leaves with the Pretty Pines thinlits dies.

I adhered everything onto a 6" x 6" piece of Serene Scenery Designer Series Paper with the lovely Bokeh Pattern, which I had adhered to an 8" x 8" pre - primed canvas.
I  popped up a sentiment, "Thankful Grateful Blessed" from the Paisleys and Petals stamp set, which I had white heat embossed onto an old olive piece of card stock.

To give everything a shimmer, I added accents with a clear Jelly Roll gel pen.


This art piece now has pride of place in my entry way, and I love it!

Thanks for visiting. I hope you like this project idea.
Vicki x  💝

Sponging Irresistibly Floral Specialty Paper Part 1


Hello, and welcome to my blog.

Today I have made a card for you using the Irresistably Floral Specialty Designer Series Paper 141644. At  $22.75 for 12 12' x 12' sheets you will have enough for plenty of cards! Look how pretty this paper is when ink is sponged over the top. You can do this with sponge daubers or a sponge, or even a thick paintbrush.


Here is what the card looks like on the inside. I love making the inside as pretty as the outside, and I love the sentiment from the Paisleys and Posies Stamp set.

 The sentiment on the front is from Remarkable You, heat embossed in white on Basic Black card stock.

I have added the Paisley Thinlits Die as the focal image for the card, and mounted everything onto a Basic Black card base.


The colours I chose were Flirty Flamingo, Rich Razzleberry, Daffodil Delight, Emerald Envy, and Tempting turquoise. I feel it has turned out to be such a pretty card. What do you think?  
Have an awesome day, and I will be back tomorrow with more cards using this technique.
 Thanks so much for shopping with me!  Vicki  x 💝

Saturday, 27 May 2017

Irresistably Floral Embossing Specialty Designer Paper. Australian Stampin' Up! Demonstrator.


Hi there! Thanks for stopping by today.
I am really enjoying this paper, and the easy embossing effects you can get with it. I have paired it with the High Tide Stamp Set, and used some of the retiring doilies, as well as the stitched Framelits, which will be carrying over into the new catty.


Here is a close up of the coloured embossed image, using versa mark, Emerald Envy ink and clear embossing powder.


The colour combo is the same for both cards, and I used sponge daubers to blend the ink. Retiring Watermelon Wonder is the card base for this card, and Daffodil Delight is the card base for the other one. The other colour I used was Emerald envy, and I love how they turned out.

Have a great day, and make mine by leaving a comment. Thank you so much for visiting,

                                                            Vicki x     💝

Coloured Embossing Powder Technique. Australian Stampin' Up Demonstrator.

Hello, and welcome! I hope you are enjoying your weekend. I am busy crafting away, and playing with this super easy embossing technique.

The Irresistibly Floral Specialty Paper #141644 will be retiring soon, and I wanted to play with some more techniques using this paper. I just can't get enough of it!

Using my sponge, I blended some rich Razzleberry and Tempting Turquoise onto my focal piece, then wiped away any residue with a tissue. Easy!

I cut a very fine strip of Blushing Bride Glimmer Paper #140550 (also retiring) and punched out some teeny tiny stars with the retired star banner punch. I heat embossed the sentiment from the High Tide stamp set #143006  onto Whisper White Card stock, then cut it out using the stitched framelits.

                                                     High Tide Photopolymer #143006
                                                              BUY NOW

Can you figure out how I made Rich Razzleberry Embossing powder?

Simply stamp into the versa mark pad, and then immediately stamp into your Rich Razzleberry inkpad.  Use clear embossing powder over the top and heat set with your heat tool.

Isn't that a neat trick? You can make ANY COLOUR embossing powder using this technique. Just make sure you clean your stamp well.

I made a matching envelope, and mounted my art piece onto a tempting turquoise top fold card.

                      Have an awesome day, and thanks for shopping with me, 
                                                              Vicki x💝

Wednesday, 24 May 2017

Best Birds Simply Rendered. Stampin' Up! Demonstrator Sydney.


Hello, and thanks for visiting by blog today.
These two cards received a lot of comment at my stamp class, so I decided to post them for you to show how simply rendered cards are often the best. The rule of threes applies here....3 colours for the card: Whisper White, Daffodil Delight and Basic Black. The birds are cut out using the Birds and Blooms thinlits and the netting and sentiments are from the Best Birds Stamp Set. 
3 small rhinestones  were coloured using Copic Markers (or you could use a black Sharpie) and the cards were trimmed with black washi tape.
Simple and fast!
I have made a video for you to see how simple these cards are to make.


My Youtube Tutorial


Birds and Blooms Thinlits  141477
Best Birds Stamp Set  141525


Have a wonderfully creative day.
 Thanks so much for shopping with me!  Vicki  x 💝

Tuesday, 23 May 2017

Soft Watercolours Technique


Hello, and thanks for visiting my blog.

Today I have a card for you that is softly watercolored using an easy technique with your Stampin' Write markers and the Best Birds stamp set.

Using the branch stamp, colour directly onto your stamp using old olive for the leaves and soft suede for the branch.
Spritz some water (not too much) onto the stamp and stamp your image onto a piece of whisper white card stock. Have a paper towel handy to blot any excess, and then heat set with your heat tool.

Use the same technique for the bird image, using mint macaron marker for the wings, soft suede for the body, and so saffron for the beak and feet.

When your paper is completely dry, finish the card by adding some copper dots washi tape to a mint macaron card base, just under your art piece, then use glue dots to adhere some fine copper thread above the bird and to the right.

Use copper embossing powder for your greeting, then cut out using the tags framelits,  and add 3 white sequins to complete your card.

                                             Best Birds Stamp Set #141525 Photopolymer
                                                                BUY NOW

Have a wonderful day.  Thanks so much for shopping with me!  Vicki  x 💝

Sunday, 21 May 2017

Intense Graduated Wash and Hand Made Bubbles!


Hello, and welcome to my blog.
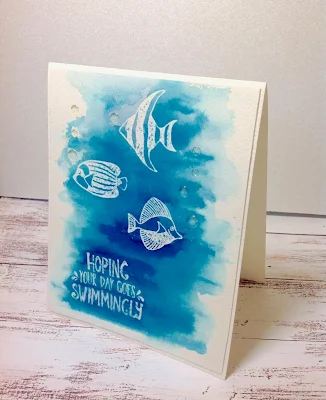
I have been experimenting with different watercolour papers to see how they respond to the Stampin' Up! inks, and I was blown away when I saw the intensity of colours you can achieve with Arches Watercolor 300 GSM Medium.


I stamped and heat embossed the images from  the Seaside Shore Stamp Set #141625 Clear mount, using clear embossing powder. You could also use white embossing powder and the effect would be very similar.

                                    Seaside Shore Stamp Set  Wood Mount #141622   #141625 Clear Mount

The key to a great watercolour card is to tape your work to something thick. I have plenty of backing sheets from all the 12 x 12 Designer Series Paper stacks I have purchased over the years, and find these are also handy when copic colouring, as the colour will bleed through onto your work surface if it is unprotected.

Back to the watercolour project... I used 3M low tack painters tape, which you can buy from any paint store. You may even have some already in the garage if you have been working on painting projects around the house, as Paul and I have!
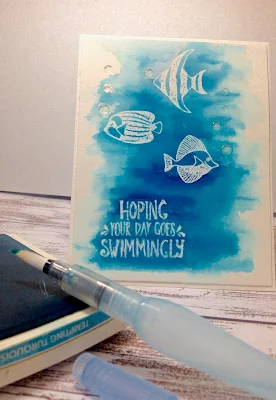
Once you have taped down your watercolour paper you can get it as wet as you like. I always keep some folded paper towel handy for blotting up any excess once I start laying down my colour, and it is helpful for cleaning my Aqua painter as well.


Look at the intensity of Tempting turquoise! Wow!

The fish are practically jumping right off the page with such a strong contrast!
I let my project dry naturally, but you could speed it up with your heat tool.

For some added pizzazz I made 3 fun bubbles in large, medium and small, coming out of each of the fishes' mouths. Fun! 
I put 3 large, 3 medium, and 3 small dots of Crystal Effects onto my silicone craft mat and let it dry overnight. You have to be patient with this, as they have to be perfectly dry when you attach them to your finished card.  

I figured since I was allowing the art panel to dry naturally (and it was getting quite late in the evening as I love night-time stamping!) I would wait for morning to see the results...and...Hey presto! Home made bubbles!

                     I hope you enjoyed today's project. I really love to hear your comments,  and have a wonderfully creative day.
                                            Thanks so much for shopping with me!  Vicki  x 💝
                               BUY NOW