Showing posts with label #AussieStampers. #AussieStampers. #Australianstampinupdemonstrator. Show all posts
Showing posts with label #AussieStampers. #AussieStampers. #Australianstampinupdemonstrator. Show all posts
Sunday, 29 April 2018
Sneak Peek Stampin' Up! 2018-2019 Annual Catalogue: Full Playlist of Videos.
Stampin' Up! 2018 - 2019 catalog SNEAK PEEK WEEK. Here is the full playlist of videos. grab a cuppa and watch them all ! Would love to hear your comments.
Have a marvellously creative day,
Vicki x
Tuesday, 30 May 2017
Grab a Cafe Bag To Go. Australian Stampin' Up! Demonstrator
The very practical Petite Cafe Gift Bags #135826 have been a big success in my classes, as I love to include a surprise Goody Bag for everyone who comes to my classes Sutherland Shire.
The cafe bags are retiring soon, so I thought I would show you what I gave away in my last class. One of the fun techniques we tried was embossing on vellum, then scribbling over it with a marker to reveal the greeting, in this case "You are remarkable" from the Remarkable You stamp set.
The bags are lined with food-safe paper so they are perfect for giving baked goods too!
Have a creative day, and thank you so much for shopping with me. Vicki x 💝
Saturday, 27 May 2017
Coloured Embossing Powder Technique. Australian Stampin' Up Demonstrator.
Hello, and welcome! I hope you are enjoying your weekend. I am busy crafting away, and playing with this super easy embossing technique.
The Irresistibly Floral Specialty Paper #141644 will be retiring soon, and I wanted to play with some more techniques using this paper. I just can't get enough of it!
Using my sponge, I blended some rich Razzleberry and Tempting Turquoise onto my focal piece, then wiped away any residue with a tissue. Easy!
I cut a very fine strip of Blushing Bride Glimmer Paper #140550 (also retiring) and punched out some teeny tiny stars with the retired star banner punch. I heat embossed the sentiment from the High Tide stamp set #143006 onto Whisper White Card stock, then cut it out using the stitched framelits.
High Tide Photopolymer #143006
BUY NOW
Can you figure out how I made Rich Razzleberry Embossing powder?
Simply stamp into the versa mark pad, and then immediately stamp into your Rich Razzleberry inkpad. Use clear embossing powder over the top and heat set with your heat tool.
Isn't that a neat trick? You can make ANY COLOUR embossing powder using this technique. Just make sure you clean your stamp well.
I made a matching envelope, and mounted my art piece onto a tempting turquoise top fold card.
Have an awesome day, and thanks for shopping with me,
Vicki x💝
Sunday, 21 May 2017
Intense Graduated Wash and Hand Made Bubbles!
Hello, and welcome to my blog.
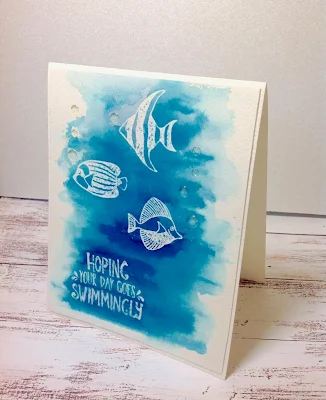
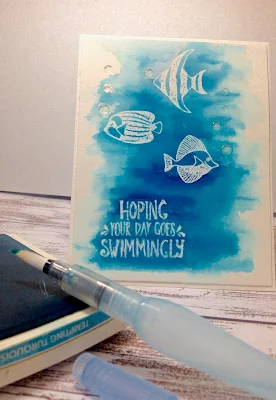
I have been experimenting with different watercolour papers to see how they respond to the Stampin' Up! inks, and I was blown away when I saw the intensity of colours you can achieve with Arches Watercolor 300 GSM Medium.
I stamped and heat embossed the images from the Seaside Shore Stamp Set #141625 Clear mount, using clear embossing powder. You could also use white embossing powder and the effect would be very similar.
Seaside Shore Stamp Set Wood Mount #141622 #141625 Clear Mount
The key to a great watercolour card is to tape your work to something thick. I have plenty of backing sheets from all the 12 x 12 Designer Series Paper stacks I have purchased over the years, and find these are also handy when copic colouring, as the colour will bleed through onto your work surface if it is unprotected.
Back to the watercolour project... I used 3M low tack painters tape, which you can buy from any paint store. You may even have some already in the garage if you have been working on painting projects around the house, as Paul and I have!
Once you have taped down your watercolour paper you can get it as wet as you like. I always keep some folded paper towel handy for blotting up any excess once I start laying down my colour, and it is helpful for cleaning my Aqua painter as well.
Look at the intensity of Tempting turquoise! Wow!
The fish are practically jumping right off the page with such a strong contrast!
I let my project dry naturally, but you could speed it up with your heat tool.
For some added pizzazz I made 3 fun bubbles in large, medium and small, coming out of each of the fishes' mouths. Fun!
I put 3 large, 3 medium, and 3 small dots of Crystal Effects onto my silicone craft mat and let it dry overnight. You have to be patient with this, as they have to be perfectly dry when you attach them to your finished card.
I figured since I was allowing the art panel to dry naturally (and it was getting quite late in the evening as I love night-time stamping!) I would wait for morning to see the results...and...Hey presto! Home made bubbles!
I hope you enjoyed today's project. I really love to hear your comments, and have a wonderfully creative day.
Thanks so much for shopping with me! Vicki x 💝
BUY NOW
Subscribe to:
Comments (Atom)


